Tuesday, December 23, 2008

Butterflies and Tulips

I was back in a stamping mood today.  I have growing collection of Studio G clear stamps from Michael's dollar bin and I decided it was high time I used them.  I am still working on card packets for Christmas so I made several of each of these cards.  Once I figured out the design, they went together fairly quickly.

  Thinking20081222

 note20081222

Sunday, December 21, 2008

Amigurumi Kitty

We are snowed in for real now.  We got six inches yesterday, then it rained last night, so we have a nice layer of ice on top and now it's snowing again.  Nobody's going anywhere unless they have chains and 4 wheel drive (we have a LOT of hills here).  This wouldn't be too much of a problem, except that I didn't finish my Christmas shopping and the forecast for the rest of the week is more of the same.  One of the two people I haven't shopped for is my granddaughter (BAD grandma!!!).

So, I decided to make something for her this year.  But what? My sewing machine is broken and somehow, I don't think a packet of greeting cards is going to fly with a three year old!  Then I remembered a box of yarn in the front closet.  I did a Google search and found an adorable "Hello Kitty" pattern at Armina's Ami-nals.  It's been ages since I crocheted, so I wasn't sure what to expect, but all things considered, I think it turned out pretty well.

005

It went together surprisingly fast except for the dress, I had a horrible time figuring that part out and ended up stitching it different from the instructions.  I know the dress and bow are supposed to be pink, but I didn't have any pink yarn.  I hope my granddaughter likes it.

If the link above doesn't work, here's the URL for the pattern:
http://arminas-aminals.blogspot.com/2008/03/ami-hello-kitty.html

If you like crochet, Armina has lots of really cute patterns.

Wednesday, December 17, 2008

Tea Bag Folding

Tonight, as I sat down to my work table, I had a difficult time trying to decide what to do.  I was originally going to do iris folding, but my iris folding stuff is in a container in the garage somewhere and it's too cold out there to go look for it, then I thought about stamping, but I've done enough stamping this week.  After mulling over several other options, I finally settled on tea bag folding.

This first card uses a simple kite fold.

20081217TB1

Instead of using the traditional printed tiles, I used scrapbooking paper cut into 1 1/2" squares.  The paper is from ProvoCraft's David Walker Studios Super Slab 7.  After putting it together I realized that I probably should have used 1 1/4" squares.  It almost did not fit on the card!

For my second card, I used the same paper for the background, but the tiles are from a book of tea bag folding paper I bought a few years ago from Search Press (ISBN 1-84448-113-1).  The tiles are pretty, but I don't like the paper they are printed on.  It is slick and rather heavy and does not fold well.

20081217TB2

This scan really does not do this card justice.  It looks much nicer when it's not flattened out.

You can find instructions for the fold here: http://www.handcraftedgreetings.com/pinwheel.html

Tuesday, December 16, 2008

Birds

Well, I think maybe I'm starting to recover my creativity.  This is the fourth consecutive day that I've made cards.  Today, I decided to try some more stamping and I needed more birthday cards for the gift sets I am making.

Digging through my craft cabinet, I found a cute bird stamp from a Stampin' Up! set I bought a few years ago.  I decided to try something new (for me) and color the stamp with watercolor pens instead of using a stamp pad.  I know this technique is nothing new, but I've always avoided it because it seemed like it would be too time consuming.  I was quite surprised and pleased with how quick and easy it was.

20081216StampedBD2

Monday, December 15, 2008

Who Needs a Wreath Stamp?

This evening, I wanted to make a card with a Christmas wreath on it, but I don't have a wreath stamp.  The roads are still pretty icy, so a trip to Michael's wasn't an option.  I decided to improvise and here's what I came up with.

20081215

Not bad for a daisy stamp, huh?  I just drew a circle on the card and stamped away.  I found another stamp that somewhat resembled a poinsettia. I stamped it on red and then on green for the leaves, cut them out, stuck them together and voila! A poinsettia.  The bow was made using my Coluzzle nested bow template.  I never have really liked it in the past, but this time I decided to use my embossing tool on it to give it some dimension and I think it came out rather nice.  The Season's Greetings stamp is from Inkadinkadoo.

Sunday, December 14, 2008

Snowed in

Today, we had our first winter storm of the year and I'm snowed in.  Well, not really, but snow here is rare enough that when it happens we all stay home.  Not that I mind all that much. 

Since it is so cold and grey out, I decided I needed to look at something to remind me of warmer weather.  Here are a couple more photo cards I made this afternoon.

001002

One of the things I am attempting to do for Christmas is put together several packets of greeting cards to give as gifts.  I don't think I am going to get as many finished as I had hoped, but today did give me an opportunity to work on them a little.  Here's another one.

003

Saturday, December 13, 2008

Cards and Photography

Two things I really enjoy are card making and photography. I especially like taking pictures of flowers. Oddly enough, I have rarely combined card making with photography. Nearly all of my photographs have been relegated to photo albums or screen savers. This evening as I sat at my work table trying to figure out what kind of card to make, I decided to give it a try. Here's what I came up with:

001

It's pretty basic, but I like it.

Saturday, November 29, 2008

Christmas Ornaments

ornaments 010

My sister came to visit for Thanksgiving and decided to stay the rest of the week (she lives over 200 miles away).  We spent Friday and Saturday together playing with craft stuff.  Our original plan was to make gifts for the rest of our siblings, but we ended up making Christmas ornaments (which may still end up being gifts for our siblings). 

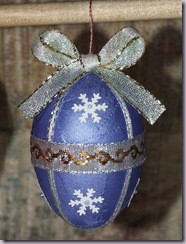
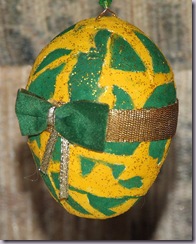
I had a carton of 48 Easter eggs in assorted sizes in my closet and was wondering if we could use them for anything.  I thought we might be able to paint them, but the paint wouldn't stick to the eggs.  I tried sanding one and painting it, but it still didn't work well, then Kathy got the idea to cover them with masking tape.  The problem was, I didn't have any masking tape.  A quick trip to the medicine cabinet revealed some medical cloth tape, so we decided to try that and it worked very well (Kathy made the green ornament above and I made the bronze one below). 

ornaments 016

We liked it so well that we took a trip to the store to buy more tape.  While we were at it, we picked up some masking tape too.  We soon discovered that the advantage of using the cloth tape is that it stretches and conforms to the shape of the eggs.  Masking tape does not so it has a bumpier texture.

For my second ornament, I decided to go for a quilted look. After putting on the layer of cloth tape, I painted each piece of tape a different color and added a design.  The colors aren't exactly Christmas colors, but I was pleased with the overall effect.

ornaments018 Next, I started playing with egg halves and discovered that if I stacked a smaller half on top of a larger half, I could make a bell. I stayed with the quilted look, but skipped the stitching this time.


ornaments019


While I was doing all that detailed painting, my sister was busy cranking out ornaments.  In all, she made ten to my four.  Oh well, they didn't call me 'Pokey' for nothing when I was a little kid.

Here's my fourth ornament...

ornaments015

Here are some more of Kathy's ornaments...

ornaments001 ornaments013 

ornaments003 ornaments002ornaments006 ornaments009

ornaments007

Saturday, November 8, 2008

Wordle It!

For those of you who scrapbook, Wordle ( http://www.wordle.com ) is a very cool site for creating word clouds you can use on album pages.  Write a paragraph or two about the pictures on your page, paste what you've written into wordle and see what comes out.  I pasted in my entire final reflective essay from my college writing class.  Here's what it generated:

image 

The more often a word is used, the larger it prints.

Here's one I made for my youngest son:

image

Wordle provides a variety of fonts, layouts and colors.  You can even create a custom color palette to match your page.

Sunday, October 26, 2008

Textured Vellum

Today I had a rare afternoon all to myself, so of course I sat down to make cards.   I stared at my empty craft table for quite a while trying to figure out what to do.  Tea bag folding? Embroidery? Iris Folding?  I just couldn't make up my mind, so I decided to rummage through a stack of paper I hadn't looked at for quite a while and discovered a few sheets of vellum with a weave texture.

I have had the vellum for quite some time. It was given to me several years ago and I never seemed to come up with an appropriate use for it because it is not nearly as transparent as most vellum used for scrapbooking.  Today, I decided to try stamping on it. 

I have a very pretty butterfly stamp from Stampin' Up.  I stamped it on the vellum using dark blue ink and then embossed it with holographic embossing powder.  you can't tell from the scan, but the effect is really pretty.

001

I punched a one and one half inch strip of vellum with my Fiskar's border punch for the left side border.  The flowers were punched with a mini-flower punch from Provo craft.  The "Thinking of you," stamp is from a Create A Card set I bought at Michael's.  I embossed the letters with silver embossing powder.

After finishing that card, I decided to try printing on the vellum.  My first couple of tries were not very successful and I was about to give up when I happened to set my printout down on a piece of bright orange paper.  The difference in background paper really brightened the image and enhanced the colors.

Here is the card I made using an image from PCCrafter.  I adjusted the brightness of the image as the colors in images printed on vellum tend to be fairly muted.

002

The border on this card was done with another Fiskar's border punch.  After punching the paper, I glued red paper to the back of it to make the leaves stand out.  The vellum is matted on a square of red scrapbooking paper, which in turn is matted on the same orange I used for the border.  I used the same "Thinking of you," stamp as before, but stamped and embossed it with red this time.

Sunday, September 21, 2008

Punch Bouquet with Embroidered Border

It's been way too long since I sat down to make cards.  I have been designing some embroidered frames the past few days and this afternoon, I decided to test one of them. 

I stitched the pattern using some variegated metallic blending filament I picked up at JoAnn's several months ago (Kreinik Metallics #95). If you'd like to try it, you can download the pattern here.

After stitching the frame, I used my Coluzzle to cut around it, then mounted it on some patterned paper.  To get ideas for the flower arrangement, I searched the Internet florist sites for bouquets with the colors I wanted. 

Here's the finished product.

getwell20080920

Thursday, July 31, 2008

Make Your Own Tea Bag Tiles

I saw a very cool kaleidoscope creator on Craft TV Weekly and just had to get it.  It is perfect for making tea bag tiles and you can even print them right from the program.

The program is very quick and easy to use and has over 50 different templates for a variety of effects and shapes.

Here are a few of the tiles I made this evening using free graphics I downloaded through Dover's weekly newsletter:

dover1


dover4


dover13

dover12 

Here is one I made from an Iris Fold card:

pinkbluelotus1

You can download an evaluation copy of kaleidoscope creator at:

http://www.kaleidoscopecollections.com/

Tuesday, July 29, 2008

Pink ATCs

Artist Trading Cards (ATCs) are something new for me.  One of the groups I participate in has an ATC swap every month or so and I have resisted until now.

This months theme is Pink. Pink makes me think of Valentine's which makes me think of hearts, so I decided to go with that.  Here are the two ATCs I made:

atcpink1-20080729s

atcpink2-20080729s

I think they turned out OK for a first attempt. I've been looking for an excuse to use those heart buttons.  The lacy-looking square mat is from the Cuttlebug Victorian collection.  The rest is leftovers.  ATCs are a great way to use up scraps.

If you've never made an ATC or would like to learn more about them, here is a site with some pretty good information:

http://www.cedarseed.com/air/atc.html

Of course there are lots more, just Google "Artist Trading Cards."

Sunday, July 13, 2008

Ice Cream

It is HOT here and there is nothing quite like ice cream for cooling down, but if you're trying to watch your weight like I am, ice water would be a much healthier choice.  With that in mind, here is a guilt-free triple-scoop cone just for you!

icecream20080713

This card is a combination of techniques.  The background behind the ice cream cone is iris folding and the ice cream cone itself is paper piecing.  The corners and the border between the upper and lower sections were made with decorative scissors.

The ice cream cone is base on clip art from PCCrafter's Summertime collection.  I printed out the line art, then used my light box to trace it onto different colored pieces of scrapbook paper.  Paper piecing is a really good way to use up small scraps.

I cut the diamond shaped aperture for the iris folding with my Coluzzle nested diamond template.  Here's the pattern for the iris folding:

irisfolddiamond

I had initially planned to include the writing around the outside of the iris folding, but I didn't think it would work well for this card.

The corners were made with paper that is green on one side and blue on the other.  I cut the paper into four one inch squares and then used my decorative scissors to cut the squares in half diagonally like this:

001

I flipped the lower-right half over (the paper used in this example was blue/brown instead of blue/green).

005

Then I layered the brown paper on top of the blue paper like this:

004

Here's the card I used the brown/blue corners on:

icecream20080712

Now, go make an ice cream cone for a friend!

Thursday, July 10, 2008

"Green" Cleaning

Ever since I took a Sustainablilty class last spring, I have tried to seek out environmentally friendly alternatives for solving every day problems whenever possible.  Sometimes it is surprising how simple it can be.

After I finished up my shaker cards a couple nights ago, I was left with a pair of very sticky scissors because I used them for cutting the double-sided foam picture hanging tape.  My first thought was to try nail polish remover, but then I started thinking about all of the chemicals involved and decided to try something different.

I don't know why I thought of it, perhaps I read it somewhere, but it seemed like vegetable oil just might do the trick.  I put a little spot of oil on a towel, began rubbing it on the blades and in no time I had a pair of clean, oiled scissors.  They cut better now too.

Tuesday, July 8, 2008

Shaker Cards

I joined a shaker card swap this week.  It's the first time I have joined a swap in months.  I decided that maybe all I needed to get back into card making was some inspiration and a deadline.

As I mentioned in a previous post, I am a clip art junkie, so I decided to peruse my vast collection for this swap and was not disappointed.  Since it's getting hot here, I decided to go with a beach theme.

shaker20080708

The frame and the background picture are from PCCrafter's Summer in the Sun collection. The seagull tag is from the Summer Seashore collection, and the wording is from the Summer collection.

I didn't have any sand, so I decided gold glitter would do.  Besides, I like sparklies! :)

You can find a very basic pattern for a shaker here: http://www.handcraftedgreetings.com/pdf/ShakerCards.pdf.

Monday, July 7, 2008

Best Friends

I cleaned off my desk today and decided to make a card with what I found. Even the string is a leftover scrap. The result is rather, ummm... primitive, but I prefer to call it "Folk Art." :)

Oh well, after being away from card making for so long, I guess I can't expect a masterpiece.

20080707Friends

The embossed heart has been floating around my desk for months and was begging to be used.  I used my Sizzlits alphabet set (I think it's called "Bounce") to cut the letters from the inside of an old Christmas card.  The heart and letters are mounted on a scrap of handmade paper, which is mounted on light blue card stock.

Thursday, June 19, 2008

A Quick Iris Fold Birthday Card

I am on a break from school and work this week and have been catching up on all the house and yard work that has been neglected over the past quarter.  One of the things I was determined to do today was clean out my craft area.  For some reason, my craft table is the repository for every piece of paper that comes into my house.  I spent the morning filing, shredding and recycling and finally accomplished my goal.

As I sat down to my empty desktop, I discovered that I just couldn't come up with any good ideas.  Just great, after struggling with writers block most of the quarter, now I have card maker's block.  Maybe this is a sign that I'm too stressed out. 

I decided to rummage through my supplies in search of inspiration and I found some iris folding card blanks I cut out last fall.  I am short on birthday cards, so I chose one with a birthday theme.  This was a good start.  Now to find some paper to go with it.  After rummaging a bit more, I found a book of iris folding papers I forgot I had.  Here is the result...

IFbirthday20080619

The book of iris folding papers is from Search Press and is simply called "Iris Folding." (ISBN 1-84448-114-X) It contains a total of 24 sheets. The colors are green, red, yellow, orange, purple and blue.

You can find iris folding instructions and patterns at http://www.handcraftedgreetings.com/irisfoldinst.php.

Friday, June 13, 2008

A Sunny Afternoon at the Park

I have been collecting cilp art from PCCrafter for about three years now with the intent to use it in something some day.  Every once in a while I will make a card with it, but mostly I just look at it, which is fun but it doesn't seem particularly practical to me.

This week, however, I decided to DO something.  Last Sunday afternoon my youngest son and I took my granddaughter, Allie to the park near our house.  This of course, provided "Oma" (that's me) with the perfect opportunity to take pictures. 

Funatthepark-small

Funatthepark1-small

Of course, pictures MUST be scrap booked, so I put together these two pages.  They will go in an "Allie" album I am making in Picaboo (You can download Picaboo for free from www.picaboo.com).  I made a Picaboo Christmas album at the beginning of the year and was really pleased with the way it turned out so I decided to start working on one for Allie.  At the rate I'm going, I might have it done by the time she's 18! :)

Here is what I used...

The clip art collections I used for my background and graphics are all from PCCrafter.  The collection names are as follows:

  • Debbie Mumm's Everyday Angels (cloud and side bar)
  • Debbie Mumm's Green Garden (backgrounds and border)
  • Friends Forever (butterflies and bunny)
  • PC Autumn Harvest Font set (on side bars)
  • LD Audrey font (journaling)

I used Printmaster Gold 18 to put the pages together.  I started to make my pages in Paint Shop Pro, but I quickly got frustrated with it because I haven't had time to learn to use it.  Printmaster was much easier!

Thursday, April 17, 2008

Junk Mail

I am taking a class on Sustainability this quarter.  So far it has been both fascinating and frustrating.  Fascinating because of the innovation that has come from the Sustainability Movement, and frustrating because the prevalent view of several of my classmates seems to be that sustainability has everything to do with the environment and nothing to do with the economy or the quality of life. Nothing could be further from the truth. (For more information see: http://www.ted.com/index.php/talks/view/id/104)

Now, you are probably asking, "What is sustainability and what does it have to do with crafts?"

To put it in a very, very simple form, sustainability is insuring that we, as well as future generations can continue to exist while preserving the environment, our economy and our quality of life. The mantra, "Reduce, Reuse, Recycle!" is a just tiny piece of it, and that's where my craft for today fits in.

For at least the first few sessions of this class, we have decided to put our names on name cards so we can get to know each other.  I thought it would be fun to make mine from junk mail.  Here is the result:

004 

The background is made from an envelope.  The border and letters are made from the inside of a security envelope.  I used my Coluzzle Swing Alphabet template to cut out the letters of my name. 

The flowers and leaves are punched from the glossy paper used for advertising flyers. To give the leaves and flowers dimension, I shaped them using an embossing tool.

 006

Glossy ad paper is perfect for punch flowers because it holds its shape well, and the vibrant colors really pop.

Sunday, April 6, 2008

String Art

String art, also known as Spirelli, is really easy to do.  All you need are some scalloped shapes and embroidery floss.  Wrap the embroidery floss around the shapes you have a beautiful design that looks like it took hours instead of minutes to make.

Here is a card I made recently for my Sister-in-law:

010

It was made using three different punches, the Marvy Uchida Giga, Mega and Jumbo scalloped circles. I wrapped two layers of floss around the two inner circles.

I created my own shapes in Paint Shop Pro Pro to make this card:

spirelli 20080325

Don't be intimidated by the cutting.  It only took about five minutes each to cut the shapes out.  If you want to try it, you can download a page of shapes here: http://www.handcraftedgreetings.com/pdf/StringArt1.pdf

You can also purchase Spirelli punches online from various craft retailers. This is not something I've done, so I do not have any recommendations.