Showing posts with label Baby. Show all posts

Saturday, March 19, 2016

Back to Basics

I've been making cards for many years now and one of the things that I've noticed is the more toys that I have the harder it is to decide which ones to use. This weekend I took a trip to the beach and as usual I wanted to bring along some paper and crafting tools in case the weather was bad (which is highly probable during March in Oregon). Rather than drag along a bunch of stuff I probably wouldn't use, I wanted to stick to the basics.  Here are the items I put in my bag that I used to make this card:
  • A  paper trimmer 
  • Scissors (Cutter Bee)
  • An embossing stylus 
  • A mechanical pencil 
  • White, silver and black gel pens (Signo Uniball UM-153) 
  • Bib Stencil  (March Simply Stencils Personal Shopper Kit)
  • A glue stick (Pioneer)
  • Assorted colors of card stock
  • Patterned paper (K & Company)
  • Design Tool Kits # 2 and #3 (Hot off the Press)
  • A light box. (If you don't have a lightbox a window will do as long as it's light outside.  Just tape the stencil to the window and tape the paper over the stencil. )
  • 5.5" x 4.25" card blank
  • Double-stick foam squares
Baby shower card for a girl


I  used my light box and embossing stylus to emboss around the outside of the bib and the bib details.  I then cut it out very close to the embossed edge leaving about a 1/32 inch border.  After cutting it out I traced around the bib and added the dots with a white gel pen.  In retrospect, that probably wouild have been easier to do before I cut it out.

Next I embossed the duck  pull toy onto yellow, orange and blue card stock, cut the pieces out and glued them over the embossed duck on the bib.  I used a black gel pen to trace the pull-string and color in the wheels.  I added the hubs with a silver gel pen.

I created the bow by embossing around the the top of the bow and the ribbon tails, then I rotated the cardstock 180 degrees and traced the top of the bow again forming the bottom of the bow.  . I drew a white line around the border and cut it out very close to the edge of the embossing.  

The labels and the scalloped mat for this card were made with Design Tool Kit # 2.   I didn't bring any stamps with me on this trip so I used my white gel pen to write the words.  For the flowers, I used the small flower from Design Tool Kit #3 and embossed it on to yellow card stock.  I hadn’t thought of using the design tools for embossing, but it worked very well.  After embossing the flowers I traced around them with the white gel pen and add a dots to the centers.

I chose a piece of the bundled sage textured card stock for the background. I mounted the scalloped Matt on white paper and trimmed around it leaving about a 16th inch border. I glued the mat to the top of the card then added the labels.    I mounted the flowers and the bib on the front of the card using double stick foam squares.  Lastly I flipped the bif stencil over and embossed the duck on the bottom right corner of the inside of the card.
Baby shower card inside
 

Monday, March 9, 2015

Baby Shower Card

Here’s a quick and simple baby shower card I made last week  using one of my older stamp sets, some scraps from the Sew Cute paper pack.

baby20150302b

Items used:

  • Sew Cute paper pack (HOTP)
  • Sweet Pea stamp set (Fiskars)
  • Welcome Home stamp set (HOTP)
  • Botanical Etchings free download (HOTP)
  • Scraps of pink and yellow patterned paper

Monday, October 28, 2013

Welcome Baby Boy

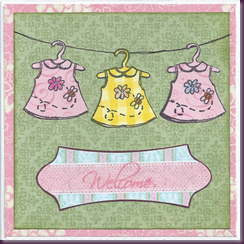
I cut the onesies for this card using the Peek-a-boo SVG set from Lettering Delights.  I used the Baby Face alphabet dies for the lettering on the onesies.

babyboy20130428

I used the Peggy banner from the Layered Ribbon Banners template for the Welcome banner.  The stamp set I used was one of those dollar sets from Michael’s.

Made With:

  • Peek-a-boo SVG set from Lettering Delights
  • Layered Ribbon Banners template (Hot Off the Press)
  • Baby Face Alphabet (Provo Craft)
  • Tiny alphabet stamps
  • Sparkle Gold Twine Cording (Maya Road)
  • Patterned paper scraps
  • Blue patterned paper
  • Green patterned paper

Sunday, March 23, 2008

New Embroidered Card For a Baby Girl

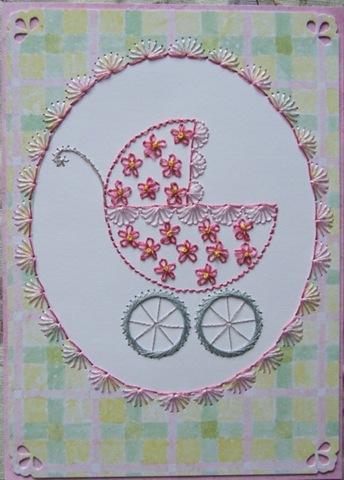
Judging from my technique poll, a lot of people want to see some new embroidery patterns.  You're in luck!  I was commissioned to make a card for a new baby girl this week.  I was given free reign on the medium and design, so I decided to go with embroidery.   Here is the result:

PEbabybuggy20080222

It took a considerable amount of time to stitch.  I tried some traditional embroidery stitches that I haven't done on a card before,  like the lazy daisy and french knot.  They lazy daisy is a little tricky, since you can't put a needle in one hole and out another simultaneously on a card like you can on cloth.  It took a little more time and was a bit more challenging than doing the same stitch on cloth, but I really like the results.  I'll probably be using this stitch again in future patterns.

If you'd like to give this pattern a try, you can find the it on the embroidery page on my main website: www.handcraftedgreetings.com.