Monday, February 25, 2008

In retrospect, the glitter was probably a bad idea...

Today's project was an iris folded shamrock.  I wanted to get the card and pattern done and posted this weekend because I'm traveling for business this week, Minneapolis in February.  I will try to contain my enthusiasm.  Not that I don't like Minneapolis, mind you, I've been there in June and found it quite nice.  I just don't like the cold and last I checked the high temperatures for the week were forecasted to be well below freezing.

But enough of that.  When I was nearly finished with my card, I realized that it was missing something and I got a (not so) brilliant idea.  I decided that adding a touch of gold around the edges would look nice.

I recently bought some Art Institute glitter and have been looking for an excuse to use it.  This seemed like a good opportunity. I added a little glue around the edges of the card and sprinkled on the glitter.  Oh my, what a mess!  Is there a trick to using this stuff so that it doesn't get EVERYWHERE? 
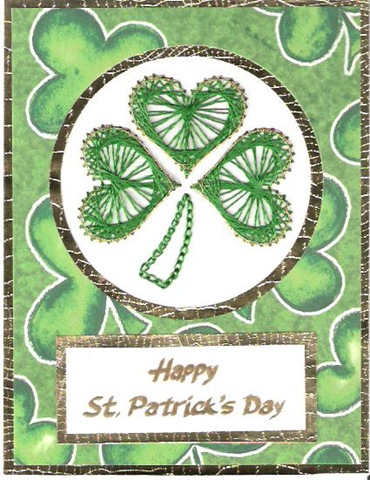
Here is the result.

ifshamrock02242008

The glitter doesn't show up all that well in the picture, but trust me, it's there... and all over my desk... and on my clothes... and in my hair!

If you'd like to try making this shamrock, you can find the pattern at:

http://www.handcraftedgreetings.com/irisfoldinst.php

I don't recommend the glitter!

Saturday, February 23, 2008

Off Topic, But Cute!

OK, I know this has nothing to do with cards, but I wanted to share this picture of my granddaughter.


DSCF2179

Her uncle, John, had just gotten out his electric piano keyboard.  Allie loves playing with it.  Five minutes is about all the rest of us can stand, especially since she discovered the volume controls! LOL.

Embroidered Shamrock Card

I wish I could say that I'm writing this post because I finished my homework.  The truth is, when I tried to open my project, (which is inside a program on the university's network, so I have no way to back it up myself) it was gone!  Completely gone.  I was totally stunned. I have been working on this project for the past two weeks and I was almost done. It is due Monday.  I am NOT a happy camper!  I am praying that they have a backup and that my professor will let me turn in the assignment late.

Since homework was out of the question, I decided to finish my card and write instructions instead. Here it is.

shamrock02232008

You can find the instructions at http://www.handcraftedgreetings.com/embrinst.php

I used the medium shamrock pattern on a 4 1/4" x 5 1/2" card.  The first two layers were stitched with green rayon embroidery floss and the third layer was stitched with gold thread. 

The shamrock paper is from one of ProvoCraft's collections and the background is a textured gold foil I bought at a local department store about a year ago. The circles were cut with my coluzzle small and large nested circle templates.

I printed the greeting with my printer, traced it with an embossing pen and embossed it with gold embossing powder.

Friday, February 22, 2008

Sneak Preview

I just finished stitching this tonight. The scan really does not do it justice.  I don't know what it is about rayon thread, but it does not scan well.  The thread has a nice gloss to it and the colors are much richer in real life.


shamrock001 

I used a chain stitch for the stem.  This is the first time I have chain stitched on paper.  I like it, but I don't think it was the right stitch for this pattern.  The leaves have two layers of green stitching and are outlined with gold.

I will be posting the pattern and instructions as well as the finished card this weekend IF I get my homework done!

Friday, February 15, 2008

Another Mini-Layout

This is a fun mini-layout I made of my Dad's 50th birthday.  It's for my 4 x 6 album.  The pages display two photos each, so I made both layouts with the same background paper.

LO20080215

Except for the number 50, The stamps I used for the page embellishments are from the dollar bin at Michael's. I stamped the images with red or blue pigment ink and then embossed them with clear embossing powder.

Tuesday, February 12, 2008

Starting Out Small

While I've been making cards for several years now, it's only been recently that I started scrapbooking.  Even though the skills and techniques are similar, the thought of filling a 12 x 12 page is pretty intimidating.  In addition to that, there are the albums themselves.  I have several albums with the acid free 4 x 6 photo sleeves and I just can't bear toss them.  I also have several years' worth of 3 x 5 photos that were taken with an old 110mm camera.  Enter the 4 x 6 scrapbook page!

This is a low stakes way for me to practice.  I don't have to worry about ruining a 12 x 12 layout and the photos aren't that great in the first place, so I won't be horribly distraught if I ruin a few.  Here are a couple of pages I put together using Christmas pictures from 1978.

1978Christmas1

1978Christmas2

OK. I'll admit, I could have used a different pattern for the background, but other than that, I think they look allright.  I used clip art from PCCrafter's Good Tidings collection and the font is PC Christmas Train, also from PCCrafter.

Saturday, February 9, 2008

Two Hearts Cut and Fold

I was supposed to do my homework tonight, so naturally, I made a card instead.  I'll do my homework tomorrow, I promise! (I'm beginning to sound like my kids!)

Since Valentine's day is just around the corner, I decided to make a Valentine's card.  I like doing cut and fold, so I created a new pattern.  This one is much simpler than the other ones I have made.

twohearts20080208

The cut and fold for this one turned out fine, but I'm really not all that crazy about the rest of the card.

You can find the cut and fold pattern at : http://www.handcraftedgreetings.com/cutandfold.php