Monday, January 21, 2008

A Winter Birthday Card

It is COLD here this week!  Well, cold for Oregon, anyway.  We are supposed to have several nights in a row well below freezing.  In light of the weather, I thought I'd make a Winter birthday card. This one is for one of the girls in our youth group.  It's not very girly, but I think it's cute.  I hope she likes it.

Bday20080121

The clip art is from the Penguin's Pastime collection at PCCrafter.  I used foil gift wrap for the iris folding. The Make a Wish stamp is by Studio g.  You can't see it in the scan, but I embossed the stamped words with holographic embossing powder.

Saturday, January 19, 2008

Dover Clip Art

I recently purchased the Treasury of Greeting Card Designs by Dover and I'm really having fun with it.  I've always loved Victorian clip art, especially the flowers.  Here is One of the cards I made today.

015

I made the coordinating tea bag tile using some of the graphics from the picture.  This was really fun to put together.

Here is the tile I used.

tristartile1

Friday, January 18, 2008

Tea Bag Folding and Dry Embossing

Two of my favorite things!

So far, I have managed to keep up with my birthday card making goal this year.  Here is a card I made this evening.  The border is done with an embossing board from the Glitter Girls.  These embossing boards are super easy to use.  All you need is the embossing board and an embossing tool. No light box. No kidding!

"No light box was harmed in the making of this card!" LOL

 tbbirthday011708


I really liked how this particular embossing board, which is part of the Victorian Varieties 1 border set, goes with my background paper (from David Walker Studios Super Slab by Provocraft).  After embossing the design on to yellow card stock, I chalked it using blue Artistic Blending Chalk from Inkadinkadoo.

The tea bag medallion was made using the tile below and the new Triple Star folding instructions from my website.

blueflowers1

Sunday, January 13, 2008

Iris Fold Birthday Cards

Today, I felt like doing a little iris folding.  I have a huge box full of pre-cut papers and card blanks just waiting to be used.  They are mostly left overs from workshops I have done in the past.  I needed to make two birthday cards, so with the two recipients in mind, I selected the backgrounds and got to work.  I am very happy with the way they turned out.  Both cards are 4 1/4" x 5 1/2".

For step by step instructions that show how to do iris folding, go to:
http://www.handcraftedgreetings.com/irisinst.html

The first one has a playful look to it.   

irisbirthday20080113a

Materials used:

  • Coluzzle nested square template
  • Square Iris fold pattern
  • Gold border peel offs
  • Happy Birthday peel offs
  • Cuttlebug swirls embossing die
  • Tape
  • 1" wide strips of giftwrap, folded in half
  • Make a Wish stamp from Studio g
  • Red pigment ink
  • Clear Embossing Powder
  • Heat gun


The second one has  a more sophisticated look.

irisbirthday20080113b

Materials used:

  • Coluzzle nested heart template
  • Heart iris fold template
  • Cuttlebug Happy Birthday embossing die
  • Silver border peel offs
  • Silver corner embellishment peel offs
  • Tape
  • 1" wide strips of giftwrap, folded in half

Monday, January 7, 2008

Wiggly-eye Flower

I made this card for one of the girls in our youth group who always has a smile on her face and a prank up her sleeve.

happyflower20080107

Equipment Used:

  • Coluzzle Flowers and Leaves template for the large flower, stem and leaves
  • Coluzzle nested diamond template
  • Coluzzle nested circle template for the large flower center
  • Uchida flower punch for the small flowers
  • Paper shapers leaf punch for the small leaves
  • Paper shapers 1/4" circle punch for the small flower centers
  • 3/16" wiggle eyes

After cutting out the diamond and the large flower, stem, leaves and center, I pasted them to black paper.  I cut them out again, leaving a 1/16" black border.  I mounted the flower on the card as shown, drew the face on the flower as well as the lines between the petals, then mounted the wiggle eyes.

Saturday, January 5, 2008

New Year Resolutions

Actually, I prefer to make goals rather than resolutions.  Goals are attainable.  Resolutions, for me, carry negative connotations.  One of my goals this year is to keep up with my friends' and family's birthdays and anniversaries.

Today, I made two cards, one is an anniversary card and the other is a birthday card.  Both cards have an image stamped on a vellum "window." 

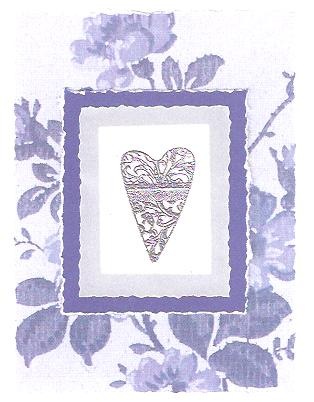
For the anniversary card, I used a heart stamp and embossed it with silver embossing powder.  I used my deckle-edged ruler to tear the edges of the vellum, the mat and the background. 

Anniversary20070105

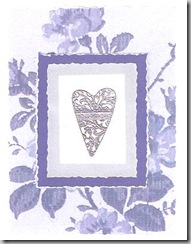
The card stock I used for the mat has a white core which makes a nice effect for the torn edge.  The background paper is from the Stack III collection from Die Cuts With A View.  I layered the background paper and mat on the card blank and cut out a 2" x 1.5" window in the center before adding the stamped vellum.

For the birthday card, I stamped and embossed a bouquet of roses onto vellum, then I used watercolor pens to color the roses and the ribbon.

birthday20070105

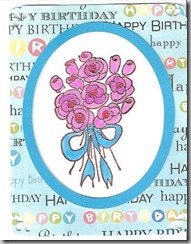
I cut out an oval from blue card stock with my Coluzzle oval template.  The background paper for this card is also from the Stack III collection from Die Cuts With A View.

I centered and glued the oval to the background paper and then glued the background paper to the card blank using temporary adhesive so that I could take the layers apart after cutting the window.  I used my Coluzzle oval template again to cut the window.  After cutting the window, I carefully separated the background layer from the card blank.  Next, I inserted the stamped vellum between the card blank and the background and used permanent adhesive to glue the background to the card blank, making sure to line up the openings.

Friday, January 4, 2008

Quick Embossed Birthday Card

This is a very quick card I put together today.

embossed birthday card

Here is what I used to make it:

  • Majestic Embossing Board from The Glitter Girls
  • Embossing tool
  • Stampendous Happy Birthday stamp
  • Paper Shapers flower and circle punches

The little flowers were a cover-up for a slight stamping mishap.  I wasn't about to throw the card out just because of a little ink spot!

Thursday, January 3, 2008

Anniversary

I made this card today for my parents' 52nd anniversary. The stamp is from a Valentine's collection I bought several years ago. I stamped the floral heart wreath with pigment ink and embossed it with gold embossing poweder. Then I colored it in with watercolor pens and cut it out. I used my cutter bee precision tip scissors to cut out the inside. After cutting it out, I mounted the heart with foam squares so that it stands out from the card. I really like the look of the watercolor pens with the gold embossing. It reminds me of stained glass.

Anniversary001

Get Well Book

My sister-in-law had surgery recently, and a get well card just didn't seem like enough so I made a book.

For the cover construction, I followed the instructions at CraftTVWeekly (more or less). You can view the instructions here:

http://sbl.tvweekly.com/player.php?43030134c9d51a817d55521d538909d5y1268

Here is my cover:

getwell001

For the cover title, I found an adorable font at PCCrafter called Patient ID that looks like a hospital ID bracelet. It is available for purchase here:

http://www.pccrafter.com/shopping/ProductDetails.aspx?id=423&s=1

Since I wanted to include a wheel and sliders on two of the pages, I needed a way to hide the back side of the pages. I also needed the pages to be fairly stiff. To solve this, I used three 5 1/2" x 4 1/4" card blanks for the pages and covered them with scrapbook paper as follows so that they formed an accordion fold.

image

After completing the pages I used the page stitching method in the Book Making video from CraftTvWeekly to stitch the valley folds of the pages together.

In all, I made eight pages for the book. I have removed most of the actual verses from the scans since they are not mine and I do not have permission to post them here. You can find numerous quotes and sentiments on the web. Scrapbook.com and versalog.com are two very good places to find verses.

getwell002

getwell003

getwell004

getwell005

This was a really fun project. Since this was my first attempt at a book, it did take quite a while to finish it. Hopefully next time it will go much faster.