Showing posts with label Trash to Treasure. Show all posts

Friday, November 29, 2013

Christmas Card From the Recycle Bin

The first challenge for December over at Paper Wishes is to make a card that has something recycled on it.  So, off I went to dig through the recycle bin.  Thankfully, we forgot to put it out this week, so I was able to find some treasures.  I found some medium weight blue paper from some glossy flyers, a blue utility envelope and a discarded paper board insert from my latest cutting die purchase from Paper Wishes.  Next, I perused my collection of salvaged security envelopes, you know, the kind with the designs printed on the inside… I sometimes use them for iris folding so I keep an eye out for interesting patterns.  I dug through those and found one with a lovely gray cross-hatch pattern and another one with a matching black pattern.  Lastly, I found an envelope from a card I received last year that had a silver lining inside the flap (yes, I am a packrat, especially if it’s shiny!).

I threw all that together with some Paper Artist cutting dies (Snowflakes and Lacy Labels), Dazzles and Christmas greeting stamps and this is what I came up with.

DSCF2745w


DSCF2746w

Not bad for trash!

Thursday, September 16, 2010

Junk Mail

I don’t know about you, but I certainly get my share of junk mail.  it seems like such a waste.  All that paper that goes straight from my mailbox to the recycle bin.  Well, today I decided to put some of it to good use and make a card.

junkmail20100916

I used my Shapeabilities Pendants die to cut the square shapes and my Nestabilities Blossom Two template to cut the flowers.  The die cuts are all from junk mail.  The backgrounds are not.

The card is based on a sketch challenge from www.CraftMad.com.au.

Sunday, June 27, 2010

Graduation Card for My Nephew

My youngest nephew graduated from high school this year.  How time flies!  Cards for guys have always been a struggle for me, so I turned to the May issue of Cardmaker magazine for some inspiration and found the perfect pattern.  The only problem was that I didn’t have the die cuts for the diploma or the graduation hat, nor did I have the stamp for the wording.

What to do?  Make my own templates, of course!  I wanted the graduation hat and the diploma to be embossed, so using a coffee can lid, I created my own embossing stencils.  It was really pretty easy as the plastic cuts very easily with an X-acto knife.  Just draw the design and cut it out.  Here’s my stencil.

stencil 

The only marginally tricky part was the swirl on the end of the diploma.

I used my cuttlebug to emboss the cap (Plate A + plate B + stencil + paper + 2 Nestabilities embossing pads + plate B).  It turned out really well.  I finished it off by adding a black brad and a tassle, which I made from black, orange and gold embroidery floss.

capdetail

The diploma didn’t  emboss well in the cuttlebug.  The paper kept tearing around the swirl, so I used an embossing tool instead.  I finished it off with a gold outline (sorry, I didn’t get a good picture of that).

Next came the wording.  I found a font that I liked and created it on my computer.  Next, I printed it out and then put it on my light box so I could trace it onto some off-white paper.  This is a tricky way to make people think I can actually write well. :)

All in all, I’m pretty pleased with the results.

20100626grad2

Saturday, January 10, 2009

Gift Bags From Old Calendars

Hopefully you haven't thrown out last year's calendar yet, because here is some more treasure from trash!  This idea came from my mother and they are so easy to make.  Even the handles are from recycled material, they were crocheted using plastic shopping bags cut in inch-wide strips.

005

These cute little gift bags can also be made from scrapbook paper, heavy weight gift wrap, or you can stamp your own design on plain paper.  In fact, these are perfect for stamping since you start out with a flat, unfolded piece of paper.

Craft Recipe:

  • Gift bag instructions
  • Page from an old calendar
  • Scoring tool
  • Ruler
  • Hole punch
  • Double-stick tape, or glue
  • Scissors

You can view my other treasure from trash projects at:
http://www.handcraftedgreetings.com/miscprojects.php

Tuesday, January 6, 2009

Another Basket

I'm a packrat.  My husband and sons will readily attest to that.  It annoys them, but sometimes it pays off.  I have been saving a Victorian calendar forever (I think it was from 1984) because the pictures are so pretty I just couldn't bear to throw it away.  As I was trying to decide what to use for my next basket, it occurred to me that the pictures on that calendar would be perfect.

Here's how it turned out.

025 

026 

027028

Since calendar pages aren't nearly as stiff as cards, I cut a center layer from heavy card stock to make the pieces sturdy enough.

Craft Recipe:

  • Basket Pattern
  • Calendar or patterned paper
  • Heavy card stock
  • Crochet cotton
  • Size 5 crochet hook
  • Size 9 crochet hook (for shell border around lid)
  • Hole punch

For the basket top, the bottom and each basket side, cut two pieces from the calendar/patterned paper and one piece from heavy card stock. You will end up with six hexagons (4 patterned and two from card stock) and 18 side pieces (12 patterned and six from card stock).

Mark and punch holes using the template for 1/8" holes.

Single crochet or blanket stitch around each piece (for crochet instructions see pattern).  Stitch or crochet the bottom of each side to a side of the hexagon shaped basket bottom.

Stitch or crochet the basket sides together. Single crochet around the top of the basket.

Basket lid:  Using a size 5 crochet hook, Single crochet four rows around the basket lid.  In each row, make two single crochets, one chain and two more single crochets in each corner.

The trim is just a simple shell border.  I stitched it with a size 9 crochet hook.  I'd write the instructions if I knew how. It's easier for me to draw, so here's a diagram:

crochetborder

Saturday, January 3, 2009

Basket made from Christmas Cards

One of the things I remember from my childhood Christmases was a basket my mother had that my grandmother had made out of Christmas cards.  I don't know what became of the basket, but when my sister was visiting last month and we were trying to figure out what to do with a box of old Christmas cards, both of us thought of the basket.  Unfortunately, neither of us had any idea how to make one so that's where the conversation ended.

A few days later, I found this link to a basket that was similar, but it wasn't quite the same as the one I remembered: http://www.allfreecrafts.com/christmas/card-basket.shtml

As I recall, the basket my grandmother made was crocheted together, not stitched and the sides were curved, not straight.  So, I decided to try to make a pattern of my own.  Here is my first attempt.

013 

I think it's pretty close to the one I remember.  I think Grandma's had a little more curve to the sides, though.  I'll have to show it to my mom and my sister and see what they think.

Here's a view from the top:

009

And another view from the front:

012

If you'd like to make one, you can find the pattern and instructions here:

http://www.handcraftedgreetings.com/miscprojects.php

Be warned, though, I have never written crochet instructions before so they might be a little hard to follow.

Thursday, April 17, 2008

Junk Mail

I am taking a class on Sustainability this quarter.  So far it has been both fascinating and frustrating.  Fascinating because of the innovation that has come from the Sustainability Movement, and frustrating because the prevalent view of several of my classmates seems to be that sustainability has everything to do with the environment and nothing to do with the economy or the quality of life. Nothing could be further from the truth. (For more information see: http://www.ted.com/index.php/talks/view/id/104)

Now, you are probably asking, "What is sustainability and what does it have to do with crafts?"

To put it in a very, very simple form, sustainability is insuring that we, as well as future generations can continue to exist while preserving the environment, our economy and our quality of life. The mantra, "Reduce, Reuse, Recycle!" is a just tiny piece of it, and that's where my craft for today fits in.

For at least the first few sessions of this class, we have decided to put our names on name cards so we can get to know each other.  I thought it would be fun to make mine from junk mail.  Here is the result:

004 

The background is made from an envelope.  The border and letters are made from the inside of a security envelope.  I used my Coluzzle Swing Alphabet template to cut out the letters of my name. 

The flowers and leaves are punched from the glossy paper used for advertising flyers. To give the leaves and flowers dimension, I shaped them using an embossing tool.

 006

Glossy ad paper is perfect for punch flowers because it holds its shape well, and the vibrant colors really pop.

Saturday, December 1, 2007

Christmas Ornaments from Old Cards

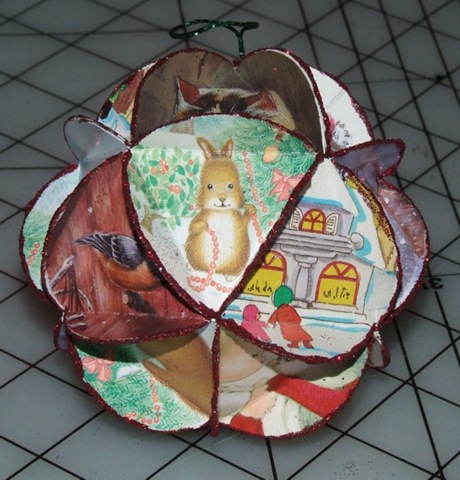
Do you ever wonder what to do with those old Christmas cards? When I was growing up, my mother taught me how to make ornaments from circles cut from old Christmas cards. It was a great way to keep us busy on rainy winter days.

012

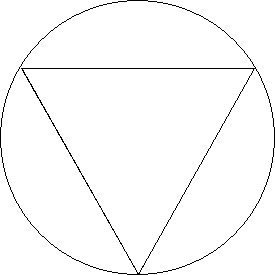
It takes 20 circles to make an ornament. I recommend using a circle cutter like a Coluzzle template, a Fiskars Circle cutter or a Circle Scissor. If you don't have one, you can download the circle and triangle template from: http://www.handcraftedgreetings.com/images/misc/ornamentpattern.jpg

You can find complete instructions at: http://handcraftedgreetings.com/pdf/ChristmasOrnamentInstructions1.pdf