Showing posts with label Easter. Show all posts

Tuesday, March 26, 2013

Mini Gift Bags for Easter

I have freebies for you today!  Three downloadable kits with an Easter party bag template, some digital papers and lots of embellishments, too.  You don’t have to have MyMemories Suite 4 to use them, but it will make it easier.

Here are three bags I made with the kits.  I didn’t make any changes to the bag on the right. I printed it straight from the download.  I started with a blank template for the bag on the left and used only elements from the three digital kits.

easterbags20130325

I made the bag in the center using the Hoppy Easter set that came with MyMemories Suite 4 .  I printed the eggs separate from the bag and then used foam squares to mount them on the front.

Grab these downloads while you can.  They will only be available for free until April 7, 2013.  Here are the links (there are 3):
Freebie 1
Freebie 2
Freebie 3

If you need help constructing them, here is a link to the instructions: http://www.mymemories.com/craftables/partybag

There’s still time to enter to win a FREE copy of MyMemories Suite 4, check out the Scrapbooking kits at MyMemories.com, then come back here and add a comment with a link to your favorite pack and include a sentence or two stating why you like that pack. Only one entry per person, please. Comments must be posted by Midnight PDT, March 31, 2013 to be eligible. I will announce the winner by the end of the day on April 1. The winner must be willing to provide me with their e-mail address so I can send them the code for the free download (do not include your e-mail address in your comment!).

Sunday, March 24, 2013

Easter Chick

MyMemories 4 isn’t just for scrapbooking.  You can make other things with it too.  See the end of this post to find out how to enter to win a free copy of MyMemories Suite 4.

This week, I decided to make an Easter card using the Easter pack that came with the MyMemories software.  Since there isn’t an egg in the provided shapes, I loaded a circle into the shape editor and made my own egg shape.  It was really pretty easy to do.

easter20130322

I created the apertures for the iris folding by layering two egg shapes for each egg, one slightly smaller than the other.  I colored the larger bottom layers pink and purple and left the top layers white.  After printing the card, I cut out the white egg apertures and added the iris folding.  The papers for the iris folding are also from the Easter paper pack.  After completing the iris folding, I added pink and purple glitter paper behind the openings.

I printed two copies of the chick and layered them using foam tape.  The bottom layer of the chick is the complete image and the top layer is just the top and bottom shell and the bow.

If you would like a chance to win a FREE copy of MyMemories Suite 4, check out the Scrapbooking kits at MyMemories.com, then come back here and add a comment with a link to your favorite pack and include a sentence or two stating why you like that pack. Only one entry per person, please. Comments must be posted by Midnight PDT, March 31, 2013 to be eligible. I will announce the winner by the end of the day on April 1. The winner must be willing to provide me with their e-mail address so I can send them the code for the free download (do not include your e-mail address in your comment!).

Tuesday, March 18, 2008

Just (barely) in time for Easter!

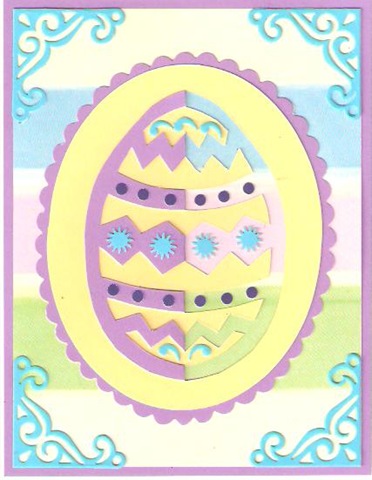
I have had the patterns finished for these cards for a couple weeks, but did not have time to make them until tonight.  They look a lot harder to make than they actually are.  The two most important tools for the job are a good, sharp craft knife paired with a good cutting mat.

cfeasteregg20080318a cfeasteregg20080318b

These cards were a lot of fun to put together.  I used paper from the Provocraft David Walker Studios Super Slab.  Having coordinating papers really helped me put them together quickly.  The card to the left has a pink background behind the cut-out, but since I wanted to take advantage of the striped effect from the paper on the card on the left, I decided to leave the cut work open open so that the background shows through.

I finished off the cards with corner die cuts I made with my Cuttlebug Victorian die set.  The eggs are decorated with punch outs from some miniature punches I bought at Michael's and with scraps from the corner die cuts.

You can find general instructions for cut and fold on my website at www.handcraftedgreetings.com/cfeaster.html or www.handcraftedgreetings.com/cfbirthday.html.

The materials and equipment I used to make these cards are as follows:

  • Double-sided paper or lightweight card stock (I used blue/dark purple for the first card and yellow/purple for the second card)
  • Solid color to put behind cutout if desired.
  • Patterned scrapbooking paper
  • Sharp craft knife (X-Acto works very well)
  • Cutting Pad
  • Tiny punches (I found most of mine in the dollar bin at Michael's)
  • Cuttlebug Victorian Die set
  • Sizzix (or Cuttlebug, or any other die cutter)
  • Decorative Scissors (for scalloped border around second egg)
  • Coluzzle small nested oval
  • Coluzzle knife
  • Coluzzle cutting mat