Showing posts with label Cut and Fold. Show all posts

Monday, September 2, 2019

Butterflies! Using up Old Embellishments and Papers

I've been digging in my embellishment pile again.  I don't remember how long ago I created this butterfly circle. It's cut from the Kaleidoscope paper collection by Hot Off The Press which has since been retired.  I backed it with some pink holographic foil and layered that on top of a paper doily from my stash (both purchased from a dollar store years ago.)  The background is also from my huge stash of paper.

The center is a round teabag tile from my site embellished with Pink Taffeta Stickles*.  I've been playing with brush pens and that's what i used for the sentiment.  I definitely need more practice!


Here's a close-up of the butterfly cut and tuck design.  I created it myself.  You can download the svg file from my website here: https://www.handcraftedgreetings.com/card.php?card_id=00268&page=1


I used Spellbinders' A2 Scalloped Borders One Card Creator Edged Die Set* for the border on the mat inside the card.  The butterflies are from a PaperArtist set by Hot Off The Press that has been retired.

How about you? Do you have anything in your embellishment pile that's begging to be used?

*If you follow a starred (*) link and purchase products, at no additional cost to you, I will receive a small commission.

Thursday, August 29, 2019

What Makes You Different...

I'm really loving Spellbinders Cut in Fold in Tuck dies! The Star Dreams Etched Die* featured here is on sale right now too! After cutting the designs out, I like to ink the backs to accentuate the folds.


For this card, I started out with a 5" x 6.5" ivory card blank. I cut the large triangle from Bubble Gum cardstock* and inked the back with Sweet Berry Ink*.  I mounted it on Raspberry Berry cardstock.  The small center motif was cut from Sweet Berry cardstock* and inked with Rasbpberry Berry ink*.


I used the Artomology Fair Feathers Eched Dies* to cut the feathers from Hucleberry Fusion* and Lemon Drop cardstock*. The sentiments are from the Artful Affirmations stamp set by Hot Off The Press.  I stamped them with Huckleberry Fusion ink* and fussy-cut around them.  The card background is from an older Colorbok collection called Neutral Basics. I popped the sentiment and the center motif up on Journey Foam Squares.

That's all there is to it! What do you think?

*If you use my links to purchase any of these products, I will receive a small commission at no additional cost to you.

Monday, July 29, 2019

This Card May Look Difficut But It Isn't!

The cut an tuck technique has come a long way since I was first introduced to it years ago.  Back then it was called LacĂ© and it was done with a metal template and craft knife.  I am so glad I no longer have to do all that intricate cutting by hand!

The die I used for this card is the Shapeabilities Puzzle Effect Etched Die*. I used it to die cut the shape from some pink patterned paper I had in my stash and I backed it with Sweet Pear cardstock*. I layered that on top of a 5" paper Doily backed with Pool Play cardstock*.


I made a 6" x 6" easel card base with Whip Cream cardstock* and covered the outside with the pink plaid paper from the Create and Bloom Prints Paper Pack*.  I cut a 5.5 x 5.5 square from the other side of the same sheet of paper and used it to cover the inside of the card.

The sentiments are from the Birthday Greetings stamp set by Hot Off The Press. I stamped them on Whip Cream cardstock* using Sweet Berry ink*.  I used the Shapeabilities Ribbon Banners Etched Dies* to cut the top banner and an old die from my stash for the inside label.  I cut the flowers from  Pool Play cardstock* and leaves from Lemon Grass cardstock* using another retired die set. I added white Party Burst Enamel Dots* to the flower centers.


Materials list

Create and Bloom Prints Paper Pack*
Shapeabilities Puzzle Effect Etched Die*
Small flowers die
Birthday Greetings stamp set (HOTP)
Shapeabilities Ribbon Banners Etched Dies*
Party Burst Enamel Dots*
Pool Play cardstock*
Lemon Grass cardstock*
Sweet Pear cardstock*
5" paper doily
Pink patterned scrapbook paper
Whip Cream cardstock*
Sweet Berry ink pad*


*This post contains affiliate links. At no additional cost to you, I may be paid a small commission if you purchase items using these links - see my disclosure for details.

Friday, July 26, 2019

Thinking of You

I've always liked doing cut and tuck so when I saw the round about die on closeout at Spellbinders I couldn't resist.  I used it to make a die cut from Summer Days cardstock*, but before I did the folding, I inked the backside with Rich Coral ink*. I then backed it with Rich Coral cardstock* and added some Seafoam Stickles* dots to the centers of the circles.

For the background, I stamped flowers from the retired Flower Party stamp set with Summer Days ink* onto a 6.5" x 5" ivory card base.

used the Paper Artist Viney Swirls die to cut some vines from Lemon Grass cardstock*. I used the Celebrate and Friendship Script Bundle* to cut, "thinking of you" from Summer Days cardstock* and arranged them on a tag from my stash.

Here's a close-up of the Round About die cut. 


Materials Used

5" x 6.5" ivory card base
Flower Party Stamp Set
Spellbinders Shapeabilities Round About die
Paper Artist Viney Swirls die
Black and White 3" x 5" tag


*This post contains affiliate links. At no additional cost to you, I may be paid a small commission if you purchase items using these links - see my disclosure for details.

Monday, April 22, 2013

My eCraft Electronic Cutting Machine

I’ve been eyeing electronic cutting machines for quite a while and finally settled on the Craftwell eCraft.  I chose it because I wanted a reasonably priced machine that I could cut my own designs on. I did a little research before buying it, so I was aware that there would be a bit of a learning curve and I was also aware that some people outright hated it.  However, it made #2 on Top 10 Reviews for electronic cutters, so I figured it couldn’t be all that bad.  I was right.  It does have its quirks, but overall I am very happy with it.

Here’s a card I made with it last weekend.

mothersday20130422

Everything on the front of the card was cut with the eCraft.  The design behind the flower is one of my cut and fold patterns.  I drew it in Open Office Draw and saved it as a .svg so I could import it into the eCraftShop Pro software that comes with the eCraft.  The flower is from the Cut Flower Easter Cut-it set from Lettering Delights.  The frame is from the Delilah Tags set and the font is Taiga.  I cut all the white pieces from linen textured vellum and the turquois pieces are cut from card stock.

The eCraftShop Pro software that comes with the eCraft is extremely limited.  If you want to separate the layers of a layered .svg, and you most likely will, then you will definitely need some third party software to do that. I asked the folks at eCraft if the ability to separate layers of .svg files was going to be built into the software in the future and was informed in no uncertain terms that there were NO plans to make ANY modifications eCraftShop Pro.

After fighting with the software for about a week, I went in search of an alternative and found Make the Cut (MTC). MTC has a plug-in  for the eCraft so that you can send files directly from it to the machine, but be warned, it is extremely slow!  If I’m going to be cutting a lot of shapes, I typically manipulate the shape in MTC, save each layer as a separate .svg and then import it into eCraftShop Pro to send it to the eCraft from there.

One of the features of the eCraft that is slightly misleading is that it does not require a cutting mat.  While that is technically true, you DO need to use a carrier sheet with most papers.  When I say carrier sheet, I mean you will need to place a piece of cardstock under the paper you are cutting.  If  you set the blade depth properly, you will be able to use the same carrier sheet multiple times before you have to replace it.  To keep it from slipping, I use a repositionable glue stick to adhere the paper I’m cutting to the carrier sheet.  Be warned though, you do NOT want to put that adhesive anywhere where it will get on the rollers!  They are a pain to clean.  Also, you don’t need to use very much adhesive at all.  The instructions on the glue stick I have say to use two coats.  You don’t need that much.  One very light coat is plenty.

So, after all that, am I happy with my eCraft? Yes. 

If I could turn back time, would I buy it again?  Most likely, given the same budget.  If I could double my budget, I think I’d probably go with a Zing instead.

Thursday, February 28, 2013

Rosemary and Thyme Cut and Fold

I just love the new Rosemary and Thyme double sided paper pack from Hot Off The Press!  At 6” x 6” they are the perfect size for cards and since they’re double sided, they are ideal for my cut and fold patterns.  I even made a few new ones!

I made this one with my Snowflake 1 template.  The flower in the center was made using the new Bodacious Blooms die from Hot Off The Press (HOTP).  That cute little label was made with the Tiny Tags and Little Labels template, also from HOTP.

birthday20130124

Next up is a get well card made with the Snowflake 2 cut and fold template.  I used the small flower off of the Giant Fold It Flower Card template from HOTP and a label from the Tiny Tags and Little Labels template.  This card was made with the Kaleidoscope double sided paper pack (HOTP).

GetWellCutAndFold20130203

These next two cards were made with the Rosemary & Thyme paper pack and the Batik paper pack (HOTP). The butterflies across the bottom of this card are from a new Butterflies cut and fold pattern I made.

20130127getwell

And last, is another butterfly pattern I made.

cutandfold20130124

Saturday, February 16, 2013

Butterflies and Flowers Cut and Fold Gate Card

Here’s a birthday card I made for a friend of mine.  This is also one of the cards I submitted to Papers and Pixels magazine.  You can find the pattern and instructions on my website at http://www.handcraftedgreetings.com/cutandfold.php

birthday20120520a  birthday20120520c

birthday20120520b

I used the Kaleidoscope paper pack from Hot Off The Press.  it is perfect for this pattern as it’s double-sided.

Saturday, May 26, 2012

Cut and Fold With Noted Paper Pack from HOTP

I’ve been in cut and fold mode lately.  It’s partly due to the two new double sided paper packs from Hot Off The Press (Kaleidoscope and Noted), and partly due to Papers and Pixels magazine asking me to write an article for their June issue (more on that in a later post).  It also helped that one of the requirements for the May Designer Challenge over at Paper Wishes was that we use the Noted paper pack in a way that shows off both sides of the paper.  With that in mind, I set out to make some new cut and fold templates.

Here’s my first entry:

PWMayChallenge

I stamped the background with the small fern stamp.  All of the papers are from the Noted pack and the label is from the 15 lovely labels template.  The cut and fold template for this card will be available in the June Papers and Pixels magazine.

After making that card, I decided to make another. One of the stamps to choose from for the challenge was the Bicycle stamp.  My original plan was to create a template that looked like the sun and just use half the template with the bicycle in the foreground and say something about riding off into the sunset.  After I got done with the prototype, I changed my mind and came up with this layout instead. 

PW2012MayChallenge2wo

The cut and fold template will be available from my website (www.handcraftedgreetigns.com) soon.

Tuesday, April 10, 2012

Retirement Card

I haven’t done any LacĂ© for a while.  I don’t know why.  It’s not all that difficult and is so pretty!  I made this card for the lunch lady at work who retired.  She is such a sweetheart.  I wanted to make something special.

Anna20110915

You can’t find LacĂ© templates anymore, but a new company is making them and they’re called GEO-Dies. They even make some that you can put through your die cutter.

More information about this card including a supply list can be found on my website at: http://www.handcraftedgreetings.com/card.php?card_id=00238

Tuesday, March 18, 2008

Just (barely) in time for Easter!

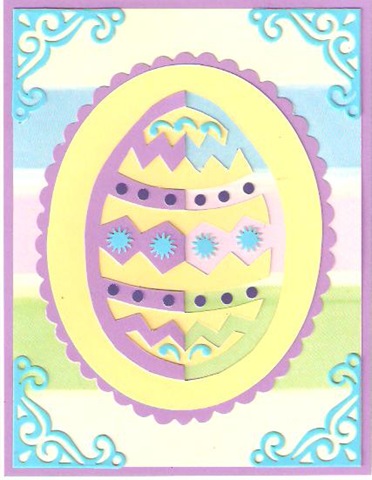
I have had the patterns finished for these cards for a couple weeks, but did not have time to make them until tonight.  They look a lot harder to make than they actually are.  The two most important tools for the job are a good, sharp craft knife paired with a good cutting mat.

cfeasteregg20080318a cfeasteregg20080318b

These cards were a lot of fun to put together.  I used paper from the Provocraft David Walker Studios Super Slab.  Having coordinating papers really helped me put them together quickly.  The card to the left has a pink background behind the cut-out, but since I wanted to take advantage of the striped effect from the paper on the card on the left, I decided to leave the cut work open open so that the background shows through.

I finished off the cards with corner die cuts I made with my Cuttlebug Victorian die set.  The eggs are decorated with punch outs from some miniature punches I bought at Michael's and with scraps from the corner die cuts.

You can find general instructions for cut and fold on my website at www.handcraftedgreetings.com/cfeaster.html or www.handcraftedgreetings.com/cfbirthday.html.

The materials and equipment I used to make these cards are as follows:

  • Double-sided paper or lightweight card stock (I used blue/dark purple for the first card and yellow/purple for the second card)
  • Solid color to put behind cutout if desired.
  • Patterned scrapbooking paper
  • Sharp craft knife (X-Acto works very well)
  • Cutting Pad
  • Tiny punches (I found most of mine in the dollar bin at Michael's)
  • Cuttlebug Victorian Die set
  • Sizzix (or Cuttlebug, or any other die cutter)
  • Decorative Scissors (for scalloped border around second egg)
  • Coluzzle small nested oval
  • Coluzzle knife
  • Coluzzle cutting mat

Saturday, February 9, 2008

Two Hearts Cut and Fold

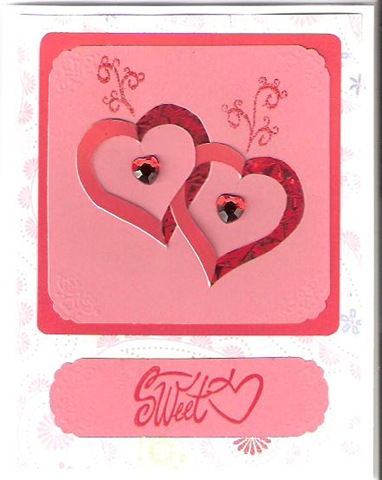
I was supposed to do my homework tonight, so naturally, I made a card instead.  I'll do my homework tomorrow, I promise! (I'm beginning to sound like my kids!)

Since Valentine's day is just around the corner, I decided to make a Valentine's card.  I like doing cut and fold, so I created a new pattern.  This one is much simpler than the other ones I have made.

twohearts20080208

The cut and fold for this one turned out fine, but I'm really not all that crazy about the rest of the card.

You can find the cut and fold pattern at : http://www.handcraftedgreetings.com/cutandfold.php

Tuesday, October 30, 2007

Halloween

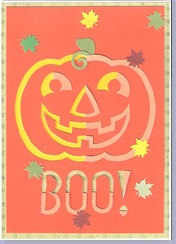
I got into the holiday spirit and created this pumpkin card using the cut and fold technique. You can get a pattern for it at http://www.handcraftedgreetings.com/. Go to the Cut and Fold Patterns page to find it.

my cards 001

I used Making Memories double-dipped orange card stock. If you're not familiar with it, it is card stock that is different colors on the front and back. I then put yellow card stock behind the cut out portions to brighten it up.