Sunday, March 24, 2019

Make One of These Adorable Traveler's Notebooks

Oh my, I am in LOVE with the Sizzix Planner Pages and More Collection! These little notebooks are so cute and they go together really fast.


Don't you just love that embossed cover?  After cutting it out of Peaches and Cream cards tock I embossed it, then I inked it with Rustic Rose ink.  So pretty!

Underneath the cardstock is a sturdy cover cut from paper board.  The inside is covered with scrapbook paper.  Would you like to know how I did it?  Here's a video tutorial:


What you will need for the Peaches and Cream notebook:
The notebook in the video is slightly different so here's the supply list for it:

Cutting it all out
  • Cut two covers from paper board 
  • Cut two covers, two pockets, two tags and one pen holder from your favorite card stock.
  • Cut two 4.75" x 7" rectangles from the coordinating scrapbook paper

Assembly:
  • Glue the paper board covers together, overlapping the spine. Make sure you line up the holes.


  • Set the cover aside to dry
  • Emboss the cardstock covers using your favorite embossing folder.

  • Ink the embossed cover to add depth.
  • After the paper board cover has dried, score it on either side of the spine where the covers overlap.

  • Carefully crease the cover on the scorelines so that that the printed side of the paper board faces out.
  • Adhere the scrapbook paper to the inside of the front and back covers so that the inside edges line up with the score lines and the rest of the edges overlap the paperboard cover by about 1/2". (refer to video at 9:00)
  • Fold and glue the excess to the outside of the covers, clipping the corners along the curves (refer to video at 10:00 )
  • Adhere the cardstock covers to the front and back paper board covers but do not adhere them to the spine. (refer to video at 13:30)
  • Glue the outer covers together along one edge as shown in the video at 17:25.
  • With the inside of the notebook facing up, lace the elastic through the holes in the cover as follows (refer to video at 19:00) :
    • Down the the top center hole
    • Up through the top left hole
    • Down through the bottom left hole
    • Up through the bottom center hole
    • Down through the top center hole (this should be the second stitch through that hole)
    • Up through the top right hole
    • Down through the bottom right hole
    • Up through the bottom center hole (this should be the second stitch through that hole)
  • Adjust the elastic tension and tie the ends.
  • Using about 12 inches of elastic, pull a loop  thorugh the hole in the center of the spine so that the loop is on the outside and the ends are on the inside (refer to video at 24:25)
  • Make sure the loop is long enough to go around the Notebook.  
  • Tie the ends on the inside.
  • Adhere the pocket to the inside front cover.
  • Adhere the pen holder to the inside back cover.
  • Cut pages using the die, or cut some paper 5 1/2" high by 7" wide and score and fold at 3 1/2".  If you cut your own pages, be sure to put a small notch at the top and bottom of the center fold.
*This post contains affiliate links. At no additional cost to you, I may be paid a small commission if you purchase items using these links - see my disclosure for details.

Monday, March 18, 2019

Craft Room Cleanup - Ribbon Storage

Over the years I've acquired quite a bit of ribbon, lace and other various types of trim. It was stored in several  places around my craft room and since it was out of sight and hard to find, I haven't used it much.  Today, I decided to get it organized in hopes that I might actually use it.  First, I dumped out all seven drawers full into one big box.

Next, I separated out the paper ribbon and put it with my gift wrap. After that, I separated all the spools and put them together.  That left me with all of  the loose ribbon and there was a lot of it.  So, I headed down to my computer and made some ribbon cards that I cut from cereal boxes.  I added little slits between each of the notches to tuck the ends into so the ends would stay put.

For the really wide ribbon, I used heavier cardboard and hand cut them to the length of my drawers. The drawers I'm using have dividers in them, so they're perfect for this method. Putting the ribbon on cards takes a lot less room than spools, but it's not quite as easy to unroll.  I seldom use more than a couple feet, so that's not a problem for me.  Here's my first drawer.  The last row holds a ribbon dispenser I bought several years ago.  I decided to leave those ribbons alone.

The bottom drawer also holds my twine as well as some other types of trim.


I also had quite a bit of trim that was too short to wrap on a card, but not quite short enough to throw away.  For those, I tied a whole bunch of loops in a piece of twine and attached the trim to the loops using a half-hitch so they will stay attached but remain easy to remove.  I hung the twine on the wall next to my workstation so the ribbons are out on display as a reminder to use them. Time will tell if this experiment works!


How about you? Do you have a ribbon storage solution that works well for  you?

Sunday, March 17, 2019

Tales From the Junk Bin

Raise your hand if you have a collection of mismatched embellishments, die cuts, labels, tags and other leftovers from the projects you've been working on.  I'm guessing I'm not the only one. I used to stick them in containers and they'd eventually migrate to a drawer or a shelf somewhere.  Recently, I decided that it might be a better idea to keep them in a tin on my work table.  This is my current (but not only) junk bin.

Today as I was trying to figure out what to work on next, I decided to rummage through the junk bin for some inspiration.  Here's what I pulled out.

Kind of a mismatched bunch, but I was determined to make something from them. The turquoise medallion and the feather* were made with dies I got from a recent order from Spellbinders.  I was just trying out the dies and didn't have anything in mind when I made them, but once I was done, I couldn't just throw them away.  The butterfly is from the Small Things stamp set* and is a leftover from a prior project. The background is from a pile of backgrounds I discovered yesterday when I was clearing out some of my old stash.

I chose 018, 015, 025 and 027 from my Journey Color Burst Pencils* that matched the colors in the medallion and feather to color the butterfly. I thought it needed a little red when I got done so I also did a little blending with some 02.

I'll admit the butterfly came out a bit more colorful than I intended, but I think it goes with the rest of the card.  I thought the medallion didn't quite pop enough by itself so I dug through my box a little more and found a circle I had cut from Summer Days cardstock* with the Journey Circles die set* and put that behind it.


 I lightly inked the edge of the background with Turbo Teal ink*. I also added some trim behind the background, you can see it peeking out on either side. I popped the butterfly and the sentiment up on Journey Foam Squares, then splattered it all with Sparkle silk and Cool Pool silk.  Not bad for a card from the junk bin.

How about you?  What's in your junk bin? 

*This post contains affiliate links. At no additional cost to you, I may be paid a small commission if you purchase items using these links - see my disclosure for details.

Friday, March 15, 2019

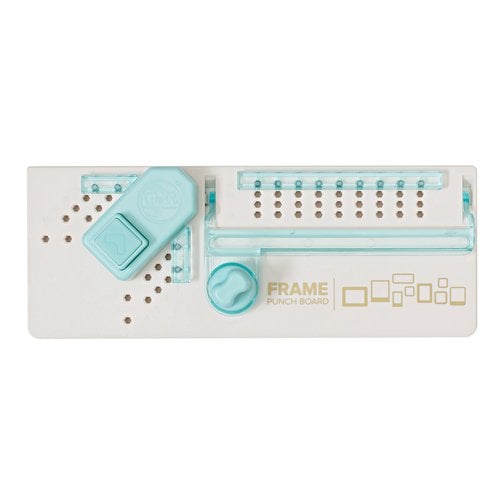
Scrapbooking with We R Memorykeepers Frame Punch Board

Last week, I picked up the We R Memory Keepers Frame Punch Board.  I'm not sure what made me do it, maybe the fact that it was on sale. As I waited for it to arrive, I was wondering if it was going to end up in my growing pile of cool but unused tools.

Today, I decided to get it out and make something with it and I have to say, I really like it. It is quite easy to use. I lost the instructions right off the bat, but that wasn't a problem. I found a video on Scrapbook.com that told me all I needed to know to get started.

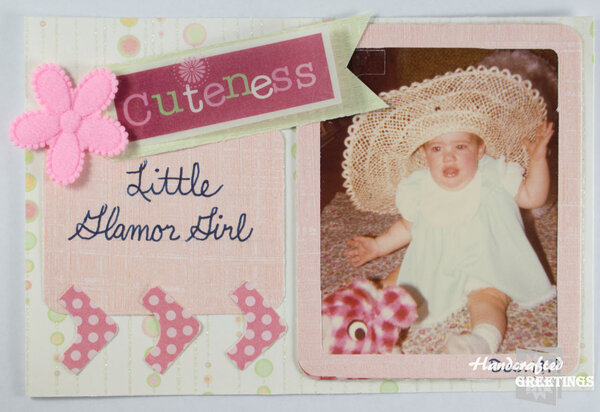
Once I had the mechanics down, I reached for one of my many boxes of photos that are in need of a scrapbook home.  I chose one of my niece that I took way back in 1979.  The photo isn't that great because the camera wasn't either (it was a 110 instamatic) but it's all I have from that era.  Since these photos are so small, I decided to scrap them on 4 x 6 bases. That way, I can just slip them into a 4x6 sleeve. This is also a great size to work with if you're intimidated by a 12 x 12 page.


First, I cropped the photo to a more appropriate size (3" x 3/3/4"), then I cut the same size rectangle from pink paper.  I rounded the corners, then set the guides to 1/4" for a narrow border, punched and trimmed and presto!  A perfectly sized frame.  I used the paper that I cut from the middle of the frame for journaling and, do you see those cute arrows at the bottom?  Those are the punch outs from another frame I made earlier.  I couldn't just throw them out, could I?  They're perfect!  To finish it off, I added a flower and a tag.

This post contains affiliate links. At no additional cost to you, I may be paid a small commission if you purchase items using these links - see my disclosure for details.

Saturday, March 9, 2019

OSW 7-13: The Final Installment

Well, these One Sheet Wonders certainly have been fun!  Here are the final seven cards.

I had a lot of fun with this birthday cake.  Once again, I dug into my hand made background stash.  The large background is on watercolor paper.  It's just a very simple gradient from yellow to orange.  The candles were cut from another background that had splashes of reds and yellows.  I managed to position the candles so the flames were more or less over the yellows.  I cut the balloons from Buttercream cardstock*.  I stamped, "happy birthday," on one then shaded them with Limeade Splash* and Chambray Shirt ink*. I added some Natural Journey Thread* for strings and popped the blue balloon up on Journey foam squares*.


Supply List:
6.5" x 5" Card blank
4.5" x 6" Watercolor background
3" x 4" patterned paper rectangle
3 1/4" x 4 1/4" Limeade Splash Cardstock*
Hammered Silver Paper

For my next card, I used the Anchored stamp set from Maymay Made it.  This one went together very quickly.  Mat the 3" x 4" patterned paper rectangle on a piece of 3 1/4" x 4 1/4" piece of Chambray Shirt* cardstock. Use Journey glue to add some sand to the bottom.  Stamp the sentiment on a 2 x 1 3/4" piece of Buttercream cardstock* and ink it with Chambray Shirt ink* then mat it on a 2 1/8 x 1 7/8 piece of Chambray Shirt Cardstock*.  Next, stamp the anchor on Chambray Shirt Cardstock* and fussy cut around it. Layer it all on the front of the card, popping up the anchor on Journey Foam Squares*.


Supply List:
4 1/4" x 5 1/2" card base
Handmade background
Anchored stamp set
3" x 4" patterned paper
1 3/4" x 2" Buttercream cardstock*
Chambray Shirt Cardstock*
Black Licorice ink  pad*
Chambray Shirt ink pad*
Sand
Journey Craft Glue*
Journey Foam Squares*
Sponge Daubers*

For the next two cards, I matted the 2 1/4" patterned paper squares on 2 1/2" Chambray Shirt Cardstock* squares.  I really like this verse from Maymay's Anchored set and wanted an undersea background so I drew one with PanPastels.  One thing I love about PanPastels is that they are very forgiving.  If you make a mistake, you can just erase it.


Supply List:


The background for this next card was made with liquid colors on photo paper.  It's a fun, easy and quick technique for making backgrounds. You can find a tutorial for making them on my YouTube channel.  The Sentiment is from the Your Faith is Showing stamp set and the butterfly is from the Small Things stamp set.  I colored it with Journey Splash Watercolor Pencils.


Supply List:
Your Faith is Showing stamp set
Chambray Shirt Cardstock*
Small Things stamp set*
Small Things die set*
Black Licorice Ink*

Here's another card featuring a Maymay Made It stamp set.  This one is Then Sings My Soul.  I adhered a 2 1/4" x 5 1/4" piece of patterned paper on the bottom of this card and added a washi tape border along the top of it. I stamped the wavy music strip directly onto the card base with Black Licorice Ink*.  I cut the circles from Chambray Shirt* and Whipcream cardstock*.  I stamped the sentiment on the Whipcream circle and stamped a few musical notes on the patterned paper.  I popped up the circles on foam squares and added them to the left side of the card front.


Supply List:

Well, hello!  The triangles in the upper and lower corners make a perfectly sized negative space for the large hello greeting. The hello is three layers thick so it stands out nicely. I used PanPastels to shade the background

Supply List:
Huge Hello die*
Party Pop PanPastels*
Chambray Shirt cardstock*
Journey Craft Glue*

And last, but not least, Thank You for visiting my blog!


Supplies
Party Pop PanPastels*
Chambray Shirt cardstock*
Lemon Drop cardstock*
Journey Craft Glue*
Charming Thank You die set*

* denotes an affiliate link. At no additional cost to you, I may be paid a small commission if you purchase items using these links - see my disclosure for details.

Sunday, March 3, 2019

OSW 5 & 6 Hugs and Sunshine

Here are two more cards in my series on Jessica Taylor's One Sheet Wonder template which can be found here:  https://www.inkitupwithjessica.com/how-to-make-one-sheet-wonder-cards/

These One Sheet Wonders really are helping me get my crafty mojo back.  They're also helping me find ways to reduce the pile of handmade backgrounds I've been accumulating.  Today's cards are simple and quick. Both use the 3" x 4" piece of patterned paper along with a background I made using shaving cream and Liquid Color.  I'm not certain which colors I used, but since I'm guessing, I'm going to say Lemon Drop and Lovely Blue.

When I was cleaning my craft room last week, I found some 4" x 5 1/2" card blanks by Recollections that I bought several years ago, so I decided to use those.

I started my fifth card in this series by adhering the patterned paper to the bottom of a card base, then I cut a 2 1/2" x 4" panel from my handmade background and glued it to the top. I added a strip of washi tape between the two for a border.  I used the Heart Felt die set to cut the large heart from Rich Coral cardstock and the small heart from Peaches and Cream cardstock  I then used a sponge dauber to shade the small heart with Rich Coral ink. That had the effect I had hoped it would and the small heart now matches the washi hearts fairly well.  I shaded the outer edge of the large heart with Raspberry Berry ink. The sentiment, which I stamped with Black Licorice ink is from the Inside & Out stamp set. I popped the small stamped heart up on foam squares and centered it on the large heart, then adhered the large heart to the front of the card.  I thought the bottom of the card needed something so I added a couple little heart jewels. They are from the Fire & Ice set from Fun Stampers Journey which has been discontinued.

My sixth card started in the same way, with the patterned paper on the bottom and another panel from the same background on the top. I used Black Jewel Border Dazzles from Paper Wishes for the border between the two panels.  I used the My Sunshine die set to cut the sun center from Pineapple Smoothie cardstock and the outer part of the sun from Summer Days cardstock. I inked the edges of the sun's center with Lemon Drop ink. I then popped it up on foam squares and adhered it to the sun outline.


I made the small banner using a 1" x 2 3/4" scrap of Pineapple Smoothie cardstock. The sentiment is also from the Inside & Out stamp set and is stamped with Black Licorice ink. That set is becoming one of my favorites. I matted the tag on a 1 1/4" x 3" piece of Limeade Splash cardstock. I adhered it to the front of the card, slightly below the border. I popped the sun up on foam squares and added it so the bottom just overlaps the banner. To finish it off I added a splattering of Sour Lemon Silk.