Monday, November 26, 2007

The Artful Mama

I was chatting with my friend, Susan this evening about her blog.  Wow! she has done some fabulous craft projects!  Check out The Artful Mama to see what she's been up to.

I wish I possessed half her talent and creativity, not to mention her patience!  I have a very difficult time working on projects where I have to wait more than about five minutes for things to dry.

Sunday, November 25, 2007

3-D Decoupage from Dollar Store Cards

One of my favorite things to do for 3-D decoupage is buy packages of cards from the dollar store.  I look for cards with well defined lines so they are easier to cut.  Here are a couple I made this afternoon.

004 

008

These were made with only three layers.  I usually like to use more layers, but I needed these to fit into an envelope for mailing.

If you've never done 3-D decoupage before, using cards is a great way to start.

Friday, November 16, 2007

Stamping Day

Stamping is something I haven't been doing for very long at all.  Right now, I'm really into heat embossing.  I love anything sparkly or shiny, so the metallic and holographic embossing powders are my favorites.  Here are some cards I finished this evening.

3cards

The stamps are from two sets I bought on sale at Michael's after Christmas last year. I used holographic embossing powder on the snowman and the Let it snow card.  You can't see it in the scan, but they really sparkle!

Thursday, November 15, 2007

A Creative Way To Use Flower Punches

A couple years ago I bought a Cornercopia.  It is a device that works with most punches for punching corners.  I played with it a little bit, but I soon lost interest and it found it's place on the bottom shelf and there it has stayed, largely undisturbed until recently.

I was cleaning my craft area last week and stumbled across it again so I started experimenting with various punches.  Here is my latest creation.

he501

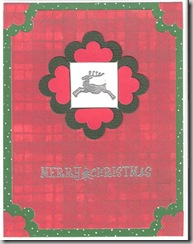
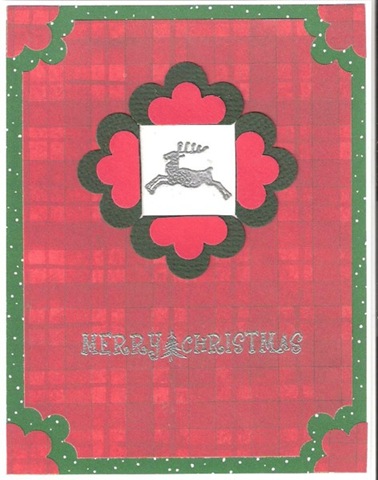
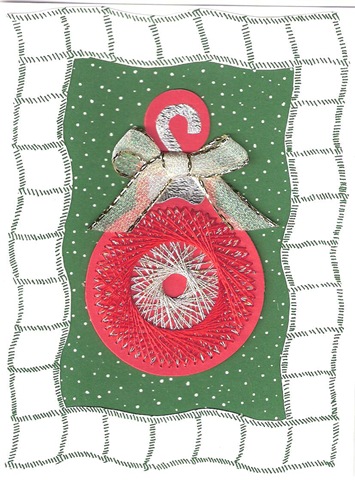
This card went together very fast and I'm really pleased with the way it turned out.  I punched the corners of the red foreground paper using my Cornercopia with a one inch flower punch.  After I glued the red foreground onto the green background,  I thought the corners looked rather bare, so I took the punch outs and glued them into the corners of the green background paper.  I really like the way it turned out.

The frame around the reindeer is made from four punched flowers, cut in half.  The two green flowers were punched with a Marvy one and one half inch flower punch and the two red flowers were punched with All Night Media's one inch flower punch.

Other items used:

  • Reindeer stamp (manufacturer unknown)
  • Merry Christmas stamp from Inkadinkadoo's Holiday Expressions stamp set.
  • Stampendous detail silver embossing powder
  • Marvy Embossing Heat Tool.

Saturday, November 10, 2007

More Embroidery Patterns!

I love the look of embroidery on paper, especially when it comes to Christmas cards. After making the red ornament using my Coluzzle template for the shape, I thought it would be fun to come up with some shapes of my own, so I opened up my favorite drawing program and went to work. This is one of the ornaments I came up with.

purpleornament

When I created the pattern, I used extra fine lines and I used gray for the pricking pattern so that it can be printed directly on the cardstock. I used metallic floss for the stitching on the ornament and green rayon floss for the tree branch.

I finished the stitching first and then cut the ornament out. After I cut it out, I thought it looked like it was missing something, so I found a darker purple to mount it on and cut it out leaving a 1/8" border around the ornament.

The top of the ornament is made from a short piece of silver ribbon and the bow is made from 1/8" gold wired edge ribbon.

Thursday, November 8, 2007

General Purpose Cards

I like to keep a small stock of general purpose card on hand so I am always prepared for life's unexpected events.  One day a short time back, I sat down with some paper scraps and made several variations of this card.

qthinking012707

It's a quick and fun card that is easy to assemble and is also a great way to use up scraps.

Here is what I used:

  • Coluzzle nested raindrop template
  • Coluzzle nested rectangle template
  • Sizzlits buton die
  • All Night Media flower punch
  • Paper Shapers leaf punch
  • Paper Shapers 1/8" circle punch
  • Thinking of You stamp from All Night Media
  • Blue stamp pad

I cut out the petals for the flower using the smallest size raindrop and glued them onto some yellow background paper.  I cut out around the petals, leaving a 1/8" border.  The center of the flower is a button shape cut from the same paper as the background using the Sizzlits button die.

After assembling the flower I used a black pen to draw stitches around each petal.

The card title was stamped with gray-blue ink on a piece of white card stock. I cut it and the background rectangle with the Coluzzle nested rectangle template.

Tuesday, November 6, 2007

Embroidered Ornament

I started with my Coluzzle shadow shapes ornament template for this card.  After I had the ornament cut out, I decided I wanted to use embroidery on it.  Normally I would do that before cutting the ornament out.

Christmas001

I used DMC metallic silver and 30321 red rayon embroidery floss for the stitching.  I love using rayon floss because it is so shiny.  Unfortunately, that does not show up in the scan.

If I make another one of these, I think I will increase the spacing between the holes and I will definitely do the stitching before cutting out the ornament.

Monday, November 5, 2007

Christmas Cards

OK, I'll admit it.  I am WAY behind on making Christmas cards this year.  I have made a grand total of four.  This is largely due to the fact that after 25 years, I decided it's time to go to college, so I've been a little busy lately.  Fortunately, for my first term, I only took one class and it ended last Wednesday night.  I should be able to find some time now to sit down and make some cards.  Next term is when the fun really begins and I will find out what it's like to go to school part time, work full time and attempt to keep the house and family in order. 

Last Monday, my best friend and I went shopping at Michael's and I found some cute Christmas sayings stamps that I just couldn't resist.  Normally, I'm not much of a stamper, but I do like to use the stamps with sayings on them.

Here is my most recent creation with one of the stamps:

irissnowflake

Materials Used:

  • Snowflake iris fold kit
  • The Let it Snow! stamp from the Inkadinkadoo Holiday Expressions stamp set.
  • Blue Pigment Ink
  • Ranger holographic embossing powder
  • Marvy snowflake punch
  • Fiskars Lace corner punch
  • Metallic silver and light blue giftwrap

Friday, November 2, 2007

Home Sweet Home

Our new preacher and his family just arrived from Mexico so I made a welcome card for them. The technique I used is called paper piecing. I based the house on some free clip art I got from PCCrafter.

my cards 001

The flowers were made from punches. You can find instructions for making punch flowers at http://www.handcraftedgreetings.com/. Go to the Free Projects and patterns section and look for the punch workshop.