For Thanksgiving this year, my son set an empty place in honor of a soldier he lost from his unit and he asked me for a rose to include in the place setting. There is quite a bit of symbolism to each item at the table and he didn't have all of them this year but he plans to make this a tradition every year.
Not knowing about the tradition beforehand, I did not realize the rose was supposed to be red, so it was white this year. I made it from a large coffee filter and I think it turned out pretty good for a first attempt. Several people asked me for a tutorial, so here it is.
The coffee filter I used is enormous, but you could use any size filter. Why do I have such enormous filters? A friend of a friend ordered the wrong size and rather than send them back, gave them to me. I've been trying to figure out what to do with them ever since.
Saturday, November 24, 2018
Sunday, November 18, 2018
Christmas Card With Spirelli Ornaments
Christmas is just over a month away and I am behind on making my Christmas cards! Here is a beautiful card that takes less time than you may think. I find Spirelli, the technique of wrapping the thread around the scalloped circles, relaxing. I love watching as the geometric forms take shape. It kind of reminds me of Spirograph.

When I make the ornaments, I don't count the notches. I like having a variety. Just remember that the fewer notches you skip, the larger the center aperture.
If you're new to Spirelli, here's a video explaining how to do it as well as instructions for completing this card. Even if you're not new to Spirelli, you might find a useful tip for keeping your thread from unraveling. ;)
* denotes an affiliate link. I may be paid a small commission if you purchase items using these links - see my disclosure for details.

When I make the ornaments, I don't count the notches. I like having a variety. Just remember that the fewer notches you skip, the larger the center aperture.
If you're new to Spirelli, here's a video explaining how to do it as well as instructions for completing this card. Even if you're not new to Spirelli, you might find a useful tip for keeping your thread from unraveling. ;)
Materials Used:
- Nestabilities Scalloped Circles Lg Etched Dies*
- Nestabilities Scalloped Circles Sm Dies*
- Journey Thread Gold*
- Mirror Gold Cardstock*
- Rich Coral Cardstock*
- Beach Ball Cardstock*
- Kiwi Slice Cardstock*
- Black Licorice True Color Fusion Ink Pad*
- Journey Sequins Holiday Elements*
- White Liner*
- Journey Foam Squares Medium*
- Journey Craft Glue*
- Joy Craft Bow Maker
- Christmas paper
- Gold Jewel Dazzles
- Gold Thread
- Silver Thread
- Iridescent Blending Filament
* denotes an affiliate link. I may be paid a small commission if you purchase items using these links - see my disclosure for details.
Friday, November 9, 2018
Thanksgiving is Just Around the Corner
THIS POST CONTAINS AFFILIATE LINKS. PLEASE READ MY DISCLOSURE FOR MORE INFORMATION.
Thanksgiving is one of my favorite holidays. I have so much to be thankful for and love getting together with friends and family.
Here's a quick Thanksgiving card I made this evening using the Bountiful Thanks* stamp set and an acrylic background I made several months ago.

I stamped the cornucopia onto Haystack cardstock* with Pumpkin Bread Ink*, colored it with Color Burst Colored Pencils* and fussy cut around it. Next, I stamped Bountiful Thanks onto Haystack cardstock and fussy cut around it as well. I cut the acrylic background to 4 1/8" x 5 3/8" and mounted it onto a 4 1/4" x 5 1/2" Pumpkin Bread* card blank. Next, I cut a scallop from Green Olive cardstock* and adhered, slightly below center and about 1/2" in from the right side of the background. I popped the cornucopia and Bountiful Thanks up on Medium or Small Foam Squares and adhered them to the front of the card.
Saturday, September 22, 2018
Use Designer Frames With Your Photos
THIS POST MAY CONTAIN AFFILIATE LINKS. PLEASE READ MY DISCLOSURE FOR MORE INFO.
I just went on a trip to Hawaii and of course, I took lots of pictures. What better way to share them than put them on cards, right? The Designer Frames die set is perfect for photos. These went together in minutes and they look great. The words are interchangeable and you can put them at either the top or the bottom of the frame. The set comes with three words, thanks, congrats and birthday plus a solid band so you have the option of stamping or writing something different.

I just went on a trip to Hawaii and of course, I took lots of pictures. What better way to share them than put them on cards, right? The Designer Frames die set is perfect for photos. These went together in minutes and they look great. The words are interchangeable and you can put them at either the top or the bottom of the frame. The set comes with three words, thanks, congrats and birthday plus a solid band so you have the option of stamping or writing something different.

You can cut these frames in two steps, but I found it easier to cut them in three. I cut the outer 4" x 5.25" frame first, then I centered the inner cut-out on that, then I cut out the word last.
I printed my pictures on 4" x 6" photo paper and added the frame to the photo before trimming the top and/or bottom off. That way I get a perfect fit every time. For these photos I used Rich Coral and Lemon Drop card stock for the frames and mounted them on 4.25" x 5.5" Whip Cream card bases.
Our card stock is on sale until the end of this month so be sure to grab some soon!
Materials list:
Designer Frames die set DI-0318 *
Whip Cream card stock CS-0040 *
Rich Coral card stock CS-0093 *
Tuesday, August 21, 2018
Backgrounds made with Liquid Color, photo paper and coffee filters
THIS POST MAY CONTAIN AFFILIATE LINKS. PLEASE READ MY DISCLOSURE FOR MORE INFO.
Grab some coffee filters, liquid color and a stack of photo paper and have some fun!
You can find the colors I used at Spellbinders*.
* denotes an affiliate link - see my disclosure for details.
---------------------------------------------------
Grab some coffee filters, liquid color and a stack of photo paper and have some fun!
You can find the colors I used at Spellbinders*.
- Cool Pool Liquid Color *
- Bubble Gum Liquid Color *
- Lavender Fusion Liquid Color *
- Lemon Drop Liquid Color *
- Candy Apple Liquid Color *
- Limeade Splash Liquid Color *
- Shimmer Gold Color Splash *
- Turbo Teal Splash *
* denotes an affiliate link - see my disclosure for details.
---------------------------------------------------
Friday, July 13, 2018
Life's Sweetness
THIS POST MAY CONTAIN AFFILIATE LINKS. PLEASE READ MY DISCLOSURE FOR MORE INFO.
I just love fresh strawberries. They remind me of everything that's good about summer and make me feel a bit nostalgic as well. I spent a lot of days in the berry fields in my formative years. I remember the pride I felt in earning my own money. I can revisit some of those memories with the stamp set from the July bloom box. Aren't these cards cute?


* denotes an affiliate link - see my disclosure for details.
I just love fresh strawberries. They remind me of everything that's good about summer and make me feel a bit nostalgic as well. I spent a lot of days in the berry fields in my formative years. I remember the pride I felt in earning my own money. I can revisit some of those memories with the stamp set from the July bloom box. Aren't these cards cute?

They look great and are simple to make. How do I know? My granddaughters, ages 7 and 8 made two of them. The only help they got from me was with the instructions. They did all of the stamping and cutting themselves.

Pretty darned cute (and their cards turned out great too!).
But that's not all you can do with this stamp set. Here are a couple more cards and a place card I made using the stamp set and items from my stash.

I had so much fun making them that I held a class and everyone loved their creations.
You can order the Life's Sweetness Bloom Box through the end of July. If you order it from me, I will send you instructions for the two cards pictured above plus four berry basket die cuts.
Order your Bloom Box here: https://www.funstampersjourney.com
The Life's Sweetness Stamp Set* will be available after August 1 while supplies last.
Questions about any of the other products I used? Post them in the comments below.
Questions about any of the other products I used? Post them in the comments below.
* denotes an affiliate link - see my disclosure for details.
Monday, May 28, 2018
How to Make a Wobbler
Here's a quick tutorial I put together today showing how to make a simple "wobbler" from wire.
Thursday, May 10, 2018
A Pretty Cylindrical Box
THIS POST MAY CONTAIN AFFILIATE LINKS. PLEASE READ MY DISCLOSURE FOR MORE INFO.
My aunt gave me a wooden cylindrical box to decorate a couple weeks ago and I had a lot of fun with it. I really like the horizontal orientation and the flap opening.
These are great for storing all kinds of little things like pencils, quilling tools and sewing supplies. You could also use one for jewelry or as a gift box.
The construction wasn't very complicated, so I decided to try making one out of card stock. Now I'm hooked. They aren't difficult to make, they are fairly sturdy and they are so fun to decorate!
 Here's a tutorial if you'd like to make one.
Materials List:
Measurements and Cutting:
Cut Ten 2 1/4" circles cut from paper board
Cut a 7" x 8.5" rectangle from cardstock
Cut two 2 1/4" circles from the remaining cardstock
Cut a 7" x 9 1/8" rectangle from scrapbook paper
Cut two 1" x 12" strips from scrapbook paper, score every 1/4" in accordion fold
Cut two 2 1/4" circles from scrapbook paper
Use the Spiral Lines die to cut two spirals from coordinating cardstock
Use the Spring Blooms Minis to cut small flowers from coordinating cardstock
Refer to the video for assembly.
* denotes an affiliate link - see my disclosure for details.
My aunt gave me a wooden cylindrical box to decorate a couple weeks ago and I had a lot of fun with it. I really like the horizontal orientation and the flap opening.
These are great for storing all kinds of little things like pencils, quilling tools and sewing supplies. You could also use one for jewelry or as a gift box.
The construction wasn't very complicated, so I decided to try making one out of card stock. Now I'm hooked. They aren't difficult to make, they are fairly sturdy and they are so fun to decorate!

Materials List:
- Paper board (a cereal box is perfect)
- 1 sheet of card stock for the liner
- Scraps of coordinating cardstock for the roses and other embellishments
- 1 sheet of scrapbook paper
- Ribbon
- A decorative button with a shank on the back
- Round elastic
- Sequins, rainbow drops, etc. for embellishments
- 2 1/4" Round cutting die (The middle die from the Journey Circles Die set *)
- Spiral Lines Die Set *
- Spring Blooms Minis *
Measurements and Cutting:
Cut Ten 2 1/4" circles cut from paper board
Cut a 7" x 8.5" rectangle from cardstock
Cut two 2 1/4" circles from the remaining cardstock
Cut a 7" x 9 1/8" rectangle from scrapbook paper
Cut two 1" x 12" strips from scrapbook paper, score every 1/4" in accordion fold
Cut two 2 1/4" circles from scrapbook paper
Use the Spiral Lines die to cut two spirals from coordinating cardstock
Use the Spring Blooms Minis to cut small flowers from coordinating cardstock
Refer to the video for assembly.
* denotes an affiliate link - see my disclosure for details.
Saturday, April 21, 2018
Happy Birthday Mom
THIS POST MAY CONTAIN AFFILIATE LINKS. PLEASE READ MY DISCLOSURE FOR MORE INFO.
A friend asked me to make a card for her mother-in-law. She didn't give me any specifics but wanted something special. I must have changed the design at least 5 times before I finally settled on this easel card with quilled flowers.

I really love how it turned out. I used my Box Envelope Tool to generate the instructions for making the envelope for the card. This really wasn't as hard to put together as it may look. I think I could do a second one in far less time. The supply list is quite lengthy, but you could substitute quite a few of the items with something you have.


* denotes an affiliate link - see my disclosure for details.
A friend asked me to make a card for her mother-in-law. She didn't give me any specifics but wanted something special. I must have changed the design at least 5 times before I finally settled on this easel card with quilled flowers.

I really love how it turned out. I used my Box Envelope Tool to generate the instructions for making the envelope for the card. This really wasn't as hard to put together as it may look. I think I could do a second one in far less time. The supply list is quite lengthy, but you could substitute quite a few of the items with something you have.
Instructions:
Card base:
- Cut one 5" x 11" rectangle from Pretty Pansy card stock and score it at 6 1/4" and 9 3/8".
- Cut one 5" x 6 1/4" rectangles from Pretty Pansy card stock.
- Adhere the first and second rectangles to form the base of an easel card.
- Cut one 5" x 6" rectangles from Pretty Pansy card stock.
- Center and Adhere the 5 1/2" doily to the 5"x 6" panel. Wrap the left and right edges of the doily around to the back of the panel and secure with tape or white liner.
- Adhere the 5" x 6" rectangle to bottom flap of the easel card.
- Stamp the banner from the Easter Blessings stamp set onto Cool Pool carsdstock using Turbo Teal ink.
- Stamp "With Love" from the Dancing Wildflowers stamp set onto the Banner using Turbo Teal Ink
- Use the banner die for the Easter Blessings die set to cut out the banner.
- Pop up the banner onto Journey medium foam squares and adhere it to the inside of the card between 1.5 and 2" from the fold line.
Front Panel
- Cut a 4.75" x 6" rectangle from Banana Cream cardstock.
- Use Clear Pigment ink and to stamp the small flower cluster from the Love Life stamp set randomly across the panel, stamping some of the images off of the edges.
- Let the ink dry for a minute or two, then use a Sponge tool to sponge Pretty Pansy PanPastel over the entire surface to create a floral background.
- Adhere the 7.5" doily to the panel, aligned slightly below the center with the right side aligned just inside the right side of the panel (refer to photo). Wrap the edges around the panel and adhere them to the back with tape or White Liner
- Stamp the music score from the Fancy Patterns stamp set onto a scrap of white paper. Tear it out and ink with Ranger Tea Die Distress Ink. Adhere it to the lower right portion of the front panel.
- Center and adhere the panel to the front of the card.
Framed Greeting:
- Print Happy Birthday Mom using size 28 ParkAvenue BT font. Trim to fit the frame (about 2 1/4" x 3").
- Use a Sofft tool with Pineapple Smoothie PanPastel to shade the edges.
- Use Deep Lilac ink to stamp the small flower cluster from the Love Life stamp set two to three times in the lower left and upper right corners.
- Glue the greeting to the back of the vintage frame.
- Center and adhere the frame to the front of the card.
Quilled Roses

- Use the 3D Flowers template and trace one small and one large ruffled rose onto Cool Pool cardstock. Cut them out, then ink the edges with Turbo Teal ink.
- Use tweezers or a quilling tool to create the roses.
- Cut two leaves from Lemon Grass cardstock using the Botanical Leaves cutting die.
- Glue the leaves and roses to the lower left corner of the frame.
Quilled Daisies

- Use detail scissors to cut a fringe along one edge of the 1/4" yellow quilling strip.
- Use a quilling tool and a 1/8" blue quilling strip to create small (just under 1/4") flower centers.
- Adhere the fringed strip to the blue center and continue for 5 to 6 more turns or when you feel like there are enough petals. Glue the end and remove from the quilling tool
- Make 4 more daisies the same way.
- Use the two leaf and three leaf dies from the Flower Frenzy die set to cut two sets of leaves.
- Adhere the leaves and daisies to the upper right corner of the frame as shown.
Materials and Supplies
- 12 Flower Frenzy Cutting Dies (Paper Artist)
- Botanical Leaves Cutting Die (HOTP)
- Journey Craft Glue *
- Journey Foam Squares - Medium *
- Banana Cream Cardstock *
- Cool Pool Cardstock *
- Lemon Grass Cardstock *
- Pretty Pansy Cardstock *
- Confectionary Days PanPastels *
- Rich Sorbets PanPastels *
- Victorian Accent Bloom Benefit
- Clear Pigment Ink Pad *
- Deep Lilac ink pad *
- Turbo Teal ink pad *
- Easter Blessings Stamp set *
- Easter Blessings Die set *
- Love Life Stamp Set
- 5 1/2 inch paper doily
- 7 1/2 inch paper doily
- 1/4 inch quilling paper - yellow
- 1/8 inch quilling paper - light blue
- Dancing Wildflowers stamp set (HOTP)
- Fancy Patterns Stamp Set (HOTP)
- Tea Stain distress ink (Ranger)
- 3D Flowers template (HOTP)
- Dauber Dowel Small *
- Quilling tool
- Tweezers
* denotes an affiliate link - see my disclosure for details.
Saturday, April 14, 2018
Pretty in Pink
THIS POST MAY CONTAIN AFFILIATE LINKS. PLEASE READ MY DISCLOSURE FOR MORE INFO.
Aren't these flowers pretty? They go together so fast too. It only takes six round tiles to make a flower and there are only three folds per tile. You can find the instructions HERE.

Both tiles are available on my website, just go to the Print Tea Bag Tiles page, select round for the tile shape and pink for the tile color. Of course, there are lots of other shapes and colors too. Why don't you hop on over and have a look?
Follow the instructions for the flower petal fold to make two flowers.
Cover the front of a 4 1/4" x 5 1/2" card blank with cloud paper.
Die cut a cloud from Whip Cream cardstock using the second to smallest Cloud Dreams die.
Die cut the grass from Kiwi Slice cardstock using the grass Border Details di.
Die cut the leaves from Lemon Grass cardstock using both the Sweet Petals and Mystic Vine die sets.
Stamp, "Feel Better Soon," on the cloud using Catalina Splash ink.
Assemble as shown, popping the grass, flowers and cloud up on Journey foam squares.
Affix a yellow rainbow drop to the center of each flower with Journey Glaze.
* denotes an affiliate link - see my disclosure for details.
Aren't these flowers pretty? They go together so fast too. It only takes six round tiles to make a flower and there are only three folds per tile. You can find the instructions HERE.

Both tiles are available on my website, just go to the Print Tea Bag Tiles page, select round for the tile shape and pink for the tile color. Of course, there are lots of other shapes and colors too. Why don't you hop on over and have a look?
Instructions:
Print six tiles of each color at size 150 (approximately 1 1/2 inches)Follow the instructions for the flower petal fold to make two flowers.
Cover the front of a 4 1/4" x 5 1/2" card blank with cloud paper.
Die cut a cloud from Whip Cream cardstock using the second to smallest Cloud Dreams die.
Die cut the grass from Kiwi Slice cardstock using the grass Border Details di.
Die cut the leaves from Lemon Grass cardstock using both the Sweet Petals and Mystic Vine die sets.
Stamp, "Feel Better Soon," on the cloud using Catalina Splash ink.
Assemble as shown, popping the grass, flowers and cloud up on Journey foam squares.
Affix a yellow rainbow drop to the center of each flower with Journey Glaze.
Supply list:
- Spring Prints (Retired)
- Two sets of six round teabag tiles
- Rainbow Drops *
- Kiwi Slice cardstock *
- Lemon Grass cardstock *
- Border Details die set *
- Sweet Petals Die Set (DI-0362)
- Mystic Vine Die Set (DI-0322)
- Cloud Dreams Die Set *
- Get Well Stamp Set *
- Journey Glaze *
- Catalina Splash Ink Pad *
* denotes an affiliate link - see my disclosure for details.
Monday, April 9, 2018
A New Take on an Old Fold
THIS POST MAY CONTAIN AFFILIATE LINKS. PLEASE READ MY DISCLOSURE FOR MORE INFO.
I've been playing with teabag tiles the past couple of days and I came up with a new (to me) fold. I don't know if anyone else has done this one before, but I haven't seen it. I was playing with the Zig Zag fold for round tiles and wondered if I could adapt it to a square tile. Why yes, I can and I like it.

For my card, I wanted to use a tile with the design radiating out from one corner, so I selected one of my pink tiles, sized it to 350 and cut it in quarters. Two tiles makes a medallion. I sized the same tile to 100 and printed five of them in a row for the strip across the card. I thought the colors in the tile match the Raspberry Berry and Bubblegum papers really well so I used those as well as a little lemon drop to accent the little bits of yellow that were originally part of the center of a flower (this tile was created from a photo of a flower). The card stock background seemed a little plain so I embossed it with the Love Letter embossing folder and then brushed it lightly with some Whip Cream ink to bring out the design. I also added Pink World sequins to the medallion to give it a little sparkle.
You can also mirror the fold for half of the tiles for a completely different look.

* denotes an affiliate link - see my disclosure for details.
I've been playing with teabag tiles the past couple of days and I came up with a new (to me) fold. I don't know if anyone else has done this one before, but I haven't seen it. I was playing with the Zig Zag fold for round tiles and wondered if I could adapt it to a square tile. Why yes, I can and I like it.

For my card, I wanted to use a tile with the design radiating out from one corner, so I selected one of my pink tiles, sized it to 350 and cut it in quarters. Two tiles makes a medallion. I sized the same tile to 100 and printed five of them in a row for the strip across the card. I thought the colors in the tile match the Raspberry Berry and Bubblegum papers really well so I used those as well as a little lemon drop to accent the little bits of yellow that were originally part of the center of a flower (this tile was created from a photo of a flower). The card stock background seemed a little plain so I embossed it with the Love Letter embossing folder and then brushed it lightly with some Whip Cream ink to bring out the design. I also added Pink World sequins to the medallion to give it a little sparkle.
You can also mirror the fold for half of the tiles for a completely different look.
Supply List
- Love Letter Embossing Folder
- Story Book Occasions Stamp Set (Retired)
- 8 tea bag tiles
* denotes an affiliate link - see my disclosure for details.
Saturday, April 7, 2018
Iris Folding Dos and Don'ts
THIS POST MAY CONTAIN AFFILIATE LINKS. PLEASE READ MY DISCLOSURE FOR MORE INFO.
It has been a long time since I have done any iris folding so last week I decided to make a card using that technique. Most of the time when I've done iris folding in the past I've either used plain cardstock or paper with a subtle pattern. This time, I wanted to use the yellow rose paper from the Through the Year paper pack. I carefully selected coordinating iris folding papers from my stash (which is mostly gift wrap). I really liked the way the colors coordinatied and was hoping for a really pretty card, but when I flipped my finished work over, well...

It was less than spectacular (it actually looks better in the photo than in real life). I tried dressing it up a bit with a yellow rose, which probably just made matters worse. The patterned gift wrap competes with the patterned background and your eyes just don't know where to focus. I was really disappointed because I really wanted to use that background paper.
Back to the drawing board. For my second attempt, I decided to go with a more monochromatic theme for the iris. I chose a combination of solid blues with holographic and foil papers. I think it turned out much better.

Once done with the iris folding, I added some sequins, a bow and a greeting. I inked the bow with Huckleberry Fusion to give it a little more texture.
So, the lesson learned from this little experiment is, you can use a busy background with iris folding, but if you do, use un-patterned papers for the iris.
Materials List
- Cellophane tape
- Journey Craft Glue *
- Journey Foam Squares - Medium *
- Pineapple Smoothie Cardstock *
- Pool Play Cardstock *
- Create a Bow Mini Die Set *
- Hexagons Die Set *
- Journey Sequins Blue Skies *
- Special Day Organza Ribbon *
- Huckleberry Fusion Ink Pad *
- Through the Year Prints Paper Pack *
- Good Stuff Stamp Set (Retired)
- Giftwrap in varying shades of blue
Monday, February 19, 2018
Buzzy Bee Quilled Birthday Card
THIS POST MAY CONTAIN AFFILIATE LINKS. PLEASE READ MY DISCLOSURE FOR MORE INFO.
Raise your hand if you have a stockpile of unfinished projects in your craft room. If your hand isn't up, you probably lie about other things too :). Some of mine are really old. For example, way back in 2004 I purchased a quilling kit (I know because I found the receipt when I was cleaning last week). Last fall, I decided to finally compete all of the projects in the kit and I did, but I didn't use them on anything. I just had a bunch of unused 3" x 3" quilled pictures. Last weekend as I surveyed my growing unfinished project pile, I decided I needed to do something about it. I told myself that for every new project I start, I have to finish at least one existing project first (we shall see how long THAT lasts!) So, inspired by my recent Mystery Box freebies, I grabbed one of my quilled creations and came up with this cute card.

Of course, a quilled card can't be put in a flat envelope, so I used my Box Envelope Tool to create a perfectly sized envelope.
Frame Instructions:
These instructions are for a 5" square frame with a 4.25" opening. They can easily be modified to fit any size artwork. The quilled artwork I used is on a 3" x 3" square.- Select a piece of patterned paper for the frame. Cut a 4 3/4" square from it, then cut a 4 1/4" square from the center to create a frame.
- Cut a piece of Pineapple Smoothie card stock to 10.5" x 5".
- Score at 5" and 5.5"
- Score a 3.5" square 3/4" in from the top and bottom and one end
- Score a 3" square in the center of the 3/4" square.
- Cut diagonally from opposite corners of the 3.5" square
- Mountain fold the 5", 5.5" and outer square score lines/
- Valley fold the inner square score lines to create four v-shaped flaps. You will glue the back of your artwork to these.

- Add the frame you created from the patterned paper around the opening before proceeding.
- Mat your 3" x 3" artwork on a piece of 3.25: x 3.25" hammered gold paper.
- Add the matted artwork to a 3.5" card stock square and glue this to the four v-flaps. The back side will look like this:

- Embellish the frame with thin line dazzles and journey twine.


Create the bottom flap:
- Cut the second largest hexagon from Dark Roast card stock
- Cut the third largest hexagon from Pineapple Smoothie card stock
- Cut the smallest hexagon from Banana Cream card stock
- Stamp Bee Happy on the smallest hexagon.
- Randomly stamp honeycombs on the Pineapple Smoothie and Banana cream hexagons using Pineapple Smoothie ink.
- Affix the Pineapple Smoothie Hexagon to the center of the Dark Roast hexagon.
- Pop the small Banana Cream hexagon up on Journey Foam Squares and position near the lower right side of the Pineapple Smoothie hexagon.
- Attach the Dark Roast hexagon to the back of the card with Flip Flop Fasteners.
Materials List
- Pineapple Smoothie card stock *
- Banana Cream card stock *
- Butter Cream card stock *
- Pineapple Smoothie ink pad *
- Dark Roast ink pad *
- Honeycomb ATS *
- Harvest Days Prints 6 x 6 Paperpack (discontinued)
- Journey Thread Gold *
- Hexagons Die Set *
- Hammered Gold Paper (Paper Wishes)
- Gold Thin line Dazzles (Paper Wishes)
- Flip Flop Fasteners (Paper Wishes)
Sunday, February 11, 2018
Getting Organized
THIS POST MAY CONTAIN AFFILIATE LINKS. PLEASE READ MY DISCLOSURE FOR MORE INFO.
Yesterday, when I walked into my craft room and looked around at the chaos, I told myself, "Enough is enough! You have to get organized."
Yesterday, when I walked into my craft room and looked around at the chaos, I told myself, "Enough is enough! You have to get organized."
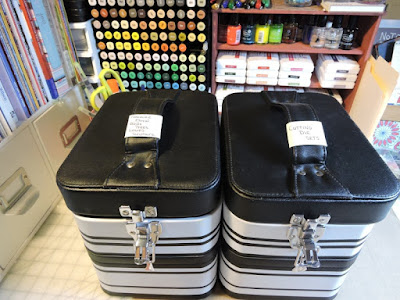
I decided to start with my Fun Stampers Journey stamp and die sets. I bought several of the storage boxes in January when they were on sale and I had been using them but I hadn't really given much thought about what was stored where. That wasn't so bad when I only had two storage boxes, but now I have five. It seems like the stamp or die set was looking for was always in the fifth box I looked in. So, I started sorting.
For my large stamp sets, I made 6" x 7 3/4" dividers out of card stock and used the square clip from the Tab Clips die set. I did this because I wanted to be able to change the category or move the position of the tab without having to create a whole new divider.

Almost all of my die sets were already stored in pouches, two to a pouch separated by tabbed dividers, but the tabs were hard to see. To remedy that, I used the round clip from the Tab Clips set and either clipped it to the front of the pouch or to the divider. These are also movable and changeable so if I decide later that I want to store my die sets differently it's no big deal, just swap out the clip.
 I did the same thing with my smaller ATS sets, but I stored them sideways in two columns instead of one. They fit perfectly this way in the smaller storage box. The ATS dividers I made are 3" x 5 1/4".

* denotes an affiliate link - see my disclosure for details.

Almost all of my die sets were already stored in pouches, two to a pouch separated by tabbed dividers, but the tabs were hard to see. To remedy that, I used the round clip from the Tab Clips set and either clipped it to the front of the pouch or to the divider. These are also movable and changeable so if I decide later that I want to store my die sets differently it's no big deal, just swap out the clip.


Next I created labels for the boxes by cutting a 4" x 1 1/4" strip from card stock, writing the box content and wrapping it around the box handles.

I could have also purchased the the label charms for each box, but I wanted to get things done right away. I also wanted them to be more visible since my eyesight isn't the best.
Here's a list of the products I used for this project. If you're interested in any if them, they are available on my Fun Stampers Journey site.
Supplies:
Thursday, February 8, 2018
Embossed Hearts and a Frenzy of Flowers
THIS POST MAY CONTAIN AFFILIATE LINKS. PLEASE READ MY DISCLOSURE FOR MORE INFO.
This card was inspired by a sketch challenge on Journey Sketches. It combines several different techniques and products. I made the background with my Gel Press. I inked it up with Pretty Amethyst and Bubble Gum ink and used the Flower Party stamp set to make the pattern. I love how it turned out! The dark strip behind the heart is a left-over scrap from another background I made on the Gel Press.

Tattered Bloom Minis Cutting Die *
Pretty Petals Stamp Set (Retired)
Pretty Petals Die Set (Retired)
Annual Celebration Stamp Set *
Flower Party Stamp Set (Retired)
Lemon Grass Cardstock *
Bubble Gum card stock *
Pretty Pansy Cardstock *
Sweet Pear card stock *
Pretty Amethyst Ink pad *
Bubble Gum Ink Pad *
Pretty Pansy Ink Pad *
Lemon Grass Ink Pad *
Journey Gel Press *
Journey Foam Squares - Medium *
Special Day Organza Ribbon *
Spring Filled Prints (Retired)
Journey Sequins Holiday Elements *
Rainbow Drops *
I also used these products from other suppliers.
Silver Inka-Gold
Fancy Flourish Embossing Folder (Paper Wishes)
Post Card Embossing Folder (Paper Wishes)
* denotes an affiliate link - see my disclosure for details.
This card was inspired by a sketch challenge on Journey Sketches. It combines several different techniques and products. I made the background with my Gel Press. I inked it up with Pretty Amethyst and Bubble Gum ink and used the Flower Party stamp set to make the pattern. I love how it turned out! The dark strip behind the heart is a left-over scrap from another background I made on the Gel Press.

I used two different embossing folders to emboss the hearts and I really love how the silver Inka-Gold makes the embossing on the darker heart pop!
Instructions
- Cut a 5 1/2" x 8 1/2" card blank from Lemon Grass card stock and fold it in half.
- Cut a 4" x 5 1/4" mat from Bubble Gum card stock
- Use the Journey Gel Press to make the background with Pretty Amethyst and Bubble Gum ink and the Flower Party Stamp Set. Cut it to 3 7/8" x 5 1/8"
- Cut a 3 1/4" wide heart from Pretty Pansy cardstock and emboss it with the Fancy Flourish embossing folder. Put a little silver Inka-Gold on a paper towel and brush it over the top of the embossed pattern.
- Cut a 2 1/2" wide heart from Bubble Gum card stock. Position it over the flowers on the Post Card embossing folder and emboss. Use a dauber or a cosmetic wedge to brush Pretty Amethyst ink over the raised portion on the debossed side.
- Cut a 2" x 3 7/8" strip from the leaf patterned paper
- Cut a 1 1/2" x 3 7/8" strip from a scrap of dark purple paper (I used left overs from another Gel Press project)
- Center the dark purple rectangle over the leaf print rectangle and glue them to the Flower Party Panel 5/8" in from the left edge.
- Cut a 6" length of organza ribbon and center it over the stacked stips as shown, attaching the ends to the back of the Flower Party panel with glue or double-sided tape.
- Affix the Flower Party panel to the Bubble Gum Mat and the Bubble Gum Mat to the card blank.
- Center the embossed Pretty Pansy heart over the vertical panels and adhere it with glue or double-sided tape.
- Pop the embossed Bubble Gum heart up on Journey Foam Squares and center it over the Pretty Pansy heart.
- Stamp three small leaf sets from the Pretty Petals stamp set onto Sweet Pear card stock with Lemon Grass ink. Fussy cut around the leaves or use the Pretty Petals die set to cut them out.
- Use the Tattered Blooms Minis die to cut flowers from Whip Cream card stock. Set three of the flowers on a foam mat (a mouse pad or scrap of fun foam works well for this). Using the large ball of the Journey Tool, press down in the center of the flowers, rubbing in a circular motion to give them a cupped shape. Glue a small slowflake shaped sequin to the center of three flowers, then glue small purple rainbow drops to the center of the sequins.
- Glue the leaves and flowers to the card as shown.
- Cut an oval from Bubble Gum card stock and stamp the Happy Valentines Day sentiment on it with Pretty Pansy ink. Mat it on Pretty Pansy card stock. Pop it up on Journey foam squares and add it to the lower right side of the card.
Supply List
Here is the list of Fun Stampers Journey products I used to make this card.
Heart-Felt Die Set *Tattered Bloom Minis Cutting Die *
Pretty Petals Stamp Set (Retired)
Pretty Petals Die Set (Retired)
Annual Celebration Stamp Set *
Flower Party Stamp Set (Retired)
Lemon Grass Cardstock *
Bubble Gum card stock *
Pretty Pansy Cardstock *
Sweet Pear card stock *
Pretty Amethyst Ink pad *
Bubble Gum Ink Pad *
Pretty Pansy Ink Pad *
Lemon Grass Ink Pad *
Journey Gel Press *
Journey Foam Squares - Medium *
Special Day Organza Ribbon *
Spring Filled Prints (Retired)
Journey Sequins Holiday Elements *
Rainbow Drops *
I also used these products from other suppliers.
Silver Inka-Gold
Fancy Flourish Embossing Folder (Paper Wishes)
Post Card Embossing Folder (Paper Wishes)
* denotes an affiliate link - see my disclosure for details.
Tuesday, February 6, 2018
Milk Carton Valentine Treat Box
THIS POST MAY CONTAIN AFFILIATE LINKS. PLEASE READ MY DISCLOSURE FOR MORE INFO.
It's February already! Where has the time gone? Do you have something for your Valentine? Here's an adorable treat box I made with the Milk Carton die *

Miniature clothes pin
10 Tags & Trims Cutting Die Set from Paper Wishes.
* denotes an affiliate link - see my disclosure for details.
It's February already! Where has the time gone? Do you have something for your Valentine? Here's an adorable treat box I made with the Milk Carton die *

The Milk Carton die is approximately 8.5" x 11" so you will need to use a larger die cutting machine such as the Journey Platinum *.
Instructions:
Cut the milk carton from Bubble Gum card stock, then use the larger heart from the Basic Box Window Plates Die to cut the heart shaped windows from two of the sides. Cut two, 2" squares from Sweet Berry card stock and glue them behind the heart shaped windows. Center the smaller heart die inside the larger window cut-out and cut the inner window. Attach a piece of Acetate inside each window.
Now you're ready to assemble the milk carton. Here's a quick tutorial:
https://www.youtube.com/watch?v=vrUDBDGQWrM
After assembling the milk carton, attach the smaller heart cut-outs to the non-window sides of the milk carton. Use the Tattered Blooms Minis die or your favorite punch to cut some small flowers from Whip Cream card stock. Add a flower with a pink sequin center and some leaves near the edge of each of the Sweet Berry hearts.
Stamp a tag with the Happy Valentine's Day stamp. Attach the tag and a double bow to a miniature clothes pin or a clip and use it to hold the milk carton shut.
Supply List:
Basic Box Window Plates Die (Retired)
Light pink organza ribbonMiniature clothes pin
10 Tags & Trims Cutting Die Set from Paper Wishes.
* denotes an affiliate link - see my disclosure for details.
Subscribe to:
Posts (Atom)