Occasionally, someone will ask me if I have additional instructions for my embroidery patterns. The short answer is, No. I rarely stitch a pattern the same way twice and it is even rarer still that I actually write down how I stitched something.
I realize that answer won't fly with most people, so here is the long answer:
There are many possibilities for stitching most of my patterns. After choosing a pattern, you will need to decide how many layers you want to stitch. After determining the number of layers, you then need to decide how many holes you want to skip for the first layer. A lower number of skipped holes will fill in less of the area of the shape and a higher number of skipped holes will fill in more of the area of the shape.
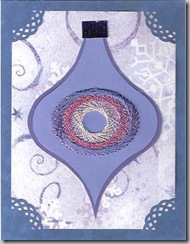
For the following example, I skipped 22 holes for the first layer of stitching, 16 holes for the second layer and 10 holes for the third layer. The pattern is the medium ornament from http://www.handcraftedgreetings.com/pdf/EmbroideredOrnaments1.pdf. I did the stitching with DMC silver embroidery floss #5283, Metallic pink embroidery floss (brand unknown) and DMC blue rayon embroidery floss #30798.
For other patterns, you may need to skip more or fewer holes depending on the size of the pattern.
- Starting at any hole, bring the needle up from the back of the card to the front (your first "up" stitch).
- Count clockwise 22 holes and pass the needle from the front to the back (your first "down" stitch).
- Count clockwise ONE hole and stitch up.
- Count counter-clockwise 22 holes (this should be the hole right in FRONT of the "up" stitch from step 1) and stitch down.
- *Count clockwise one and stitch up.
- Count clockwise 22 and stitch down .
- Count clockwise one, stitch up.
- Count counter-clockwise 22 and stitch down.
- Repeat from the * until you have stitched all the way around the pattern.
Your stitching will eventually overlap so that when you are completely finished each hole will have two stitches in it forming a "V."
For subsequent layers, repeat steps 1 through 9, decreasing the number of holes skipped between each stitch for each layer (for example, skip 16 holes for the second layer instead of skipping 22).
Hopefully that all makes sense! Once you get the hang of it, try using the same procedure but skip a different number of holes.
Diamonds, squares and other straight edged shapes are very similar, you just have to make sure that you skip enough holes so that you will not be making two stitches on the same side. For example, if you're stitching a diamond that has 10 holes per side, you should skip at least 11 holes.


